_________________I am Mrs. Kalpana Mhaske, a Home-Maker, from the city of 52-Gates, one of the famous heritage- destination of the world- Ajanta - Ellora Caves, Bibi-Ka- Maqbara (The Taj of Deccan) and Deogiri Fort. i.e. AURANGABAD. I admire cooking - tryout and innovate different cuisines. Basically, both of my gorgeous daughters are foodie, they have always encouraged me in the kitchen and forced to carve a Food Blog, that’s why, I am happy to share the makings with you. I am an artist too. Painting – especially, Canvas-Painting is my one more hobby. In total - Ours is an ART-FAMILY, my husband is an Architect. In the end, I keep the same belief with Louise Fresco - “ Food, in the end, in our own tradition, is something holy. It's not about nutrients and calories. It's about sharing. It’s about honesty. it’s about identity ”

Thursday, 20 August 2020

COLOURFUL UKADICHE / STEAMED MODAK

Ganesh Chaturthi [also known as Vinayaka Chaturthi] is the Hindu festival celebrated in honur of the elephant-headed god, Lord Ganesha. This is very auspicious day celebrated to pray the god so that every new activity that is started is successfully completed without any obstacles. As with all festivals, hymns are sung, prayers are recited and prasad [offering in the form of food] is made. Legend has it that Modak are Lord Ganesha’s favourite sweet and are thus made by devotees to offer to him as prasad. Traditionally Mahrashtrian households prepare these modaks by making a rice flour dough and then filling it with freshly scraped and grated coconut-jaggery stuffing. Sweet shops across the length and breadth of the country are flooded with modaks of every size, flavour and colour, but traditional steamed ones are hard to find at retail shops and they are the best. Maharashtrian Modak recipe popularly known as Ukadiche Modak in my try list for long time. Last year I tried , but the plain ones, so this year plan to make the colourful ones. I was very curious about the colourful pari/ cover, so watched so many videos on You Tube which helped me lot to solve all my doubts and to make a good modak recipe.  Apart from shaping the modak, I didn’t feel anything difficult in this recipe. I must admit here that the outer covering/ pari needs some practice. But I really want to try and love this ukadiche modak, so tried them with the mould. Though I have used a modak mould, you don’t need compulsorily one. A little practice and you can easily make them by hand as the dough is filled, pulled, twisted and shaped exactly like one would a momo.  


INGREDIENTS:
For Outer Cover:
1 Cup Rice Flour
1 Cup Water
Salt to taste
½ teaspoon Ghee
For Stuffing:
½ Cup Jaggery
1 Cup Fresh grated Coconut
¼ teaspoon Cardamom Powder
1 teaspoon Poppy Seeds
Other Ingredients:
Yellow and Red Food Colour
1 teaspoon Ghee
METHOD:
For Making Outer Cover:
STEP 1 – In a vessel, add water, salt and ghee and bring it to boil.
STEP 2 – When water begins to boil, add rice flour and mix it.
STEP 3 – Turn off the gas and cover it for 10 minutes.
For Making Stuffing:
STEP 1 – Heat up a pan on medium flame, add poppy seeds and dry roast it for 1 minute.
STEP 2 – Then add grated coconut, roast it for about 2 minutes.
STEP 3 – Add grated jaggery and mix well.
STEP 4 – Fry for about 5-7 minutes until the mixture becomes a little dry.
STEP 5 – Turn off the gas and add cardamom powder and mix it.
STEP 6 – Let the mixture cool down to room temperature and stuffing is ready.
How to proceed:
STEP 1 – Take the ukad/ rice mixture into a big dish/ bowl and knead it really well for approximately 7-8 minutes.
STEP 2 – If you feel ukad is getting dry and unable to knead, then you can use a little ghee or hot water for kneading.
STEP 3 – Divide the ukad in equal 3 portions [depends upon how many colours you are going to use].
STEP 4 – Add a drop of red colour in one dough portion and mix well. Keep it covered.
STEP 5 – In another portion, add a drop of yellow colour and knead it again.

STEP 6 – Now we have 3 coloured dough balls of equal size.
 
 
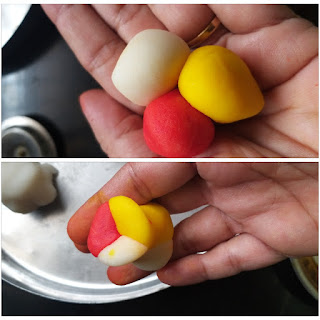
STEP 7 – Divide each of them in equal small portions, like red, yellow and white. Cover the dough with wet cloth.
STEP 8 – Now take 1 ball from each colored portion and press them together as shown in the picture below. It should be properly sealed and there should be no gap left. 
 
STEP 9 – If it is sticking to your hand while making pari or modak, then use some rice flour while making pari. I have used modak mould as I am not expert in making modak with pari. Grease the mould with ghee.
 
STEP 10 – Put the mixed colored dough ball in a greased modak mould and press well. Keep the gap to fill with stuffing.
 
STEP 11 – Fill the gap with the stuffing and seal it from the bottom with some dough.
 
 STEP 12 – Heat a steamer with water in it. Grease a banana leaf with some ghee and keep it aside.
 
STEP 13 - Likewise prepare all the modaks and keep aside.
 
STEP 14 – Once all the modaks are done, place the modak onto a steamer plate, which have been lined with banana leaf or muslin cloth. [I used idli steamer and a colander to steam my modak]
 
STEP 15 – Steam the modak for 15-20 minutes on a medium flame.
 
 
STEP 16 – Pour in some ghee onto the steaming hot modak and they are ready to be served.


RAJASTHANI LEHSUN KI CHUTNEY

As the name suggests Rajasthani Lehsun Ki Chuntey is chutney made using garlic. This chutney is very spicy, flery and sharp but well balanced in flavours. It can be served with any paratha or meals comprising dal, rice, chapati, etc. It is quite peppery and therefore can zest up any boring meal. I have shared different varieties of garlic chutney on my blog earlier. But there find difference in recipe and also texture. This chutney is very easy and simple to make and is very popular in India. It can be used in many different ways and more importantly has a long shelf life compared to the other traditional south indian chutney. Try this chutney recipe and see how you get addicted to it in no time.    
 
 
πŸ“ŒπŸ“Œ Watch the full video recipe here πŸ“ŒπŸ“Œ


INGREDIENTS:
1 large bulb Garlic Cloves, peeled
4-5 Dry Red Chillies
1-2 teaspoon Kashmiri Red Chilli Powder [for colour]
Salt as needed 
1 teaspoon Cumin Seeds
1 teaspoon Mustard Seeds
5-6 tablespoon Water
4 tablespoon Oil
 
METHOD:
STEP 1 – In a blender jar, add garlic cloves, red chillies, red chilli powder, cumin seeds, salt 

and water and blend it to fine-smooth paste.
 
 
STEP 2 – Now heat oil in a pan.
STEP 3 – Add mustard seeds and let them crackle. 
 
 
STEP 4 – Add chutney mixture to it along with some water.
 
 
STEP 5 – Stir well and let it cook on medium to low flame until raw smell vanishes. Chutney thickens after some time and loses oil. Stir it occasionally to prevent burning.
 
 
STEP 6 – Cool it completely and then store in clean, air tight container. It’s shelf life is upto 2 weeks when stored in refrigerator.
 
 
Serve this spicy lehsun chutney with any paratha and enjoy. You can also serve it with some Indian snacks.


Wednesday, 8 July 2020

ALUCHI PATAL BHAJI/ ALUCHE FATFATE

Aluchi Patal Bhaji is also known as Aluche Fatfate is a Maharashtrian delicacy made with Alu/ Taro/Colocasia / Arbi leaves. It is healthy and popular Maharashtrian green leaf vegetable recipe. The curry is mainly prepared on special occasions like Wedding and Shradh. Alu is Marathi word for Colocasia. So do not confuse Alu with Aloo. I have alu in my terrace garden and few days back I shared ali wadi prepared with that. This recipe is on my to do list from last so many days. So prepared this curry and it turned out super delicious. Use tamarind and jiggery which increases the richness of taste. A green leafy vegetable is very important to complete a meal. Colocasia leaves are a very good source of Vitamin A and C and contain more protein.


INGREDIENTS:
3-4 Alu / Colocassia Leaves
¼ Cup Chana Dal
¼ Cup Peanuts
2 tablespoon Sliced Coconut
1 teaspoon Jaggery
1 teaspoon Cumin Seeds
1 teaspoon Mustard Seeds
2 tablespoon Chana Dal
½ teaspoon + 1 teaspoon Red Chilli Powder
¼ teaspoon Turmeric Powder
Salt as needed
1 tablespoon Goda / Kala Masala
8-10 Garlic Cloves
2-3 Dry Red Chillies
1 Tomato, roughly chopped
1 Onion, roughly chopped
2-3 tablespoon Tamarind Pulp
4 tablespoon Oil
1 teaspoon Asafoetida
Chopped Coriander

For Tempering:
2-3 tablespoon Oil
2-3 Dry Red Chillies
8-10 Garlic cloves, roughly chopped
1 teaspoon Mustard Seeds
1 teaspoon Cumin Seeds


METHOD:
STEP 1 – Soak chana dal and peanuts separately in 2 bowls for 2 hours.


STEP 2 – Wash, pat dry and chop alu leaves finely. Remove the stem from leaves before cutting.


STEP 3 – Heat pan with a teaspoon oil, add cumin and mustard seeds and let them crackle.


STEP 4 – Add asafoetida and chopped alu leaves and sautΓ© it for 1-2 minutes.


STEP 5 – Now in a pressure cooker add, soaked chana dal, peanuts, coconut slices, turmeric powder, 1 teaspoon red chilli powder, goda masala, salt and 10-12 garlic cloves roughly crushed.
STEP 6 – Then add sauted alu leaves and 1 ½ cup water, close the lid and make 2 whistles.


STEP 7 – Cool it and then open the lid from pressure cooker. Mash the bhaji with a masher.


STEP 8 – Heat a pan, dry roast gram flour with 1 teaspoon red chilli powder. Transfer it into another bowl and keep it aside.


STEP 9 – In a mixer pot, add roughly chopped onion, tomato and 2-3 dry red chillies


and blend it to make fine paste. Keep this aside.


STEP 10 - Now pour cooked mixture in a pan and add tamarind pulp, jaggery and gram flour paste and mix well.


STEP 11 – Let it heat and come to boil.  Boil it on low flame for 2-3 minutes.


STEP 12 – Switch off the flame and keep this bhaji aside.


For making tempering:
STEP 1 - Heat 2-3 tablespoon oil in a tempering pan, and crackle cumin, mustard seeds. Add 1-2 dry red chillies and cook for 1 minute.


STEP 2 - Add a pinch of asafoetida and remaining garlic cloves crushed roughly. Let’s cook the garlic till nice light brown in colour.


STEP 3 – Pour this tempering over the bhaji, add chopped coriander and mix it well and bhaji is ready to serve.


Aluchi patal bhaji tastes best when served as a side dish with chapatti/ bhakari.


NOTES: Fry Alu leaves well since some persons may be sensitive to these leaves that could induce an itching sensation and frying will kill the itchiness of the leaves.


Sunday, 5 July 2020

MURGH MALAI TIKKA [in oven]


A popular Indian classic, commonly known as Murg Malai Tikka/ Kebab. Before I begin with the recipe, let's talk about Murgh Malai Tikka. "MURGH" means cubed pieces of chicken, "MALAI" means cream and "TIKKA" means pieces of meat marinated in a spicy mix. So Murgh Malai Tikka is simply small pieces of chicken cooked in a cream and yogurt-based marinade and grilled to perfection.  A chicken malai tikka recipe for soft, juicy kebabs on skewers that will simply melt in your mouth. Serve it with naan, chapati, roti or as a starter to your parties and get together. Perfect for an outdoor barbecue or luncheon. You can make different wraps with them and you can never go wrong with these simple yet tasty kebabs. I am damn sure that these kebabs will make your appetite satisfy. 


INGREDIENTS:

500 gms Boneless Chicken, cut into bite size cubes
1 Onion, cut into bite size cubes
1 teaspoon Kasoori Methi
For Marination:
1 Cup Hung Curd
3 tablespoon Cream Cheese [optional]
1 tablespoon Cream
1 tablespoon Ginger-Garlic Paste
3 tablespoon Mint + Coriander Chutney
1 tablespoon Lemon Juice
1 teaspoon Green Chilli Paste [optional]
1 teaspoon Cornflour
1 Teaspoon Cumin Powder
1 teaspoon Red Chilli Powder
Salt as needed
2 tablespoon Vegetable Oil

METHOD:

STEP 1 – Clean and cut the chicken in small bite-size pieces.


STEP 2 - In mixer pot, add green chillies, mint and coriander leaves and make a fine paste.


STEP 2 – Combine all the ingredients for marination with the green paste in a mixing bowl. Whisk to form a smooth paste.


STEP 3 – Add chicken pieces, onions cubes and mix well to coat everything nicely.


Add lemon juice and give a nice mix.

STEP 4 – Cover with cling wrap or a lid and keep covered in the fridge for minimum 30 minutes. If you have time, it’s better to keep it overnight.


STEP 5 – Pre-heat the oven at 400 degrees F/ 180 degree C for 10 minutes.

STEP 6 - Remove from fridge 45 minutes-1 hour before baking.

STEP 6 – Line the skewers in a baking tray and lightly spray some oil over the skewers.


STEP 7 – Arrange the marinated chicken pieces on the skewers.


STEP 8 – Bake for 10 minutes at 180 degrees C and then turn the side.
STEP 9 – Lightly spray the side up with oil and bake from the other side for about 8-10 minutes. 
STEP 10 – Remove and immediately transfer on a serving plate and serve hot.


Serve hot with your favourite chutney/dip and enjoy.

NOTES: *Time may vary depending on the brand of the oven.