_________________I am Mrs. Kalpana Mhaske, a Home-Maker, from the city of 52-Gates, one of the famous heritage- destination of the world- Ajanta - Ellora Caves, Bibi-Ka- Maqbara (The Taj of Deccan) and Deogiri Fort. i.e. AURANGABAD. I admire cooking - tryout and innovate different cuisines. Basically, both of my gorgeous daughters are foodie, they have always encouraged me in the kitchen and forced to carve a Food Blog, that’s why, I am happy to share the makings with you. I am an artist too. Painting – especially, Canvas-Painting is my one more hobby. In total - Ours is an ART-FAMILY, my husband is an Architect. In the end, I keep the same belief with Louise Fresco - “ Food, in the end, in our own tradition, is something holy. It's not about nutrients and calories. It's about sharing. It’s about honesty. it’s about identity ”

Friday, 13 October 2017

CHICKEN CAFREAL

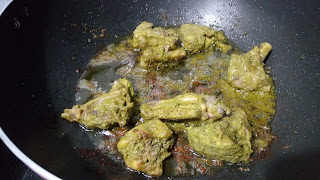
Chicken Cafreal is a famous recipe brought down by Portuguese in Goa, State of India. It is actually originated in Mozambique from a dish called Galinha. Afterwards Portuguese adopted this recipe and made some changes in it before reaching Goa.  Traditional Goan Chicken Cafreal is not only popular among tourists but loved by all for its classic flavour. The main attraction for me about this recipe is its vibrant green colour. The colour of the gravy comes from the cafreal masala paste which is in vibrant green colour. The paste have a wonderful blend of aromatic spices which makes it tantalizing and delicious. Normally, it is prepared with whole chicken legs, but you can make them with thighs too.  I saw many posts from my foody friends which are basically from Goa, which cheered me to try this spicy chicken gravy. The lovely aroma of the gravy is so divine. You can use the cafreal masala for not only for making chicken but also for vegetarian recipes too, like mushrooms, paneer and vegetables. There are many variations to a Chicken Cafreal but as I am new for this Gaon Food Saffari, I searched the easiest version of it on net and tried it. Hope I made a justice with the recipe. Please feel free to add comments below in comment box, if you have visited this blog. Looking forward for your suggestions.


INGREDIENTS:
1 kg Chicken, cut into pieces
1-2 “Ginger
6-7 Garlic Cloves
 5-6 Green Chillies [accordingly]
1 Cup Chopped Fresh Coriander
½ Cup Mint Leaves
5-6 Spinach Leaves
2-3 Spring Onions
½ teaspoon Black Peppercorns
4-5 Cloves
½ tablespoon Poppy Seeds
2 Lemons
3 Medium Size Onions
30 ml Vinegar
8-10 Cashew Nuts
1 tablespoon Tamarind [optional]
½ tablespoon Cumin Seeds
1 tablespoon Garam Masala Powder
½ tablespoon Sugar
Salt to taste
1 teaspoon Turmeric Powder
Water
2-3 tablespoon Oil
Capsicum Rings for garnishing

METHOS:
STEP 1 – Make a fine paste using ginger, garlic, green chillies, peppercorns, cloves, coriander leaves, spinach leaves, mint leaves roughly chopped onions, cashew nuts, tamarind, poppy seeds, cumin seeds and garam masala.
STEP 2 – Marinade the chicken pieces with turmeric powder, salt, lemon juice for 10 minutes.
STEP 3 – After that, marinade it with the green paste and coat the chicken pieces well with the green masala.

STEP 4 - Keep aside for 3-4 hours.
Marinade overnight for the best results. If marinating more than 1 hour then keep it in refrigerator.  
STEP 4 – Heat oil in a wide pan.
Remove the marinated chicken pieces from the paste and fry well on either sides in covered pan.
Cook the chicken in small batches on low-medium heat.
Each batch should be cooked for about 10-15 minutes.
STEP 5 – Keep the cooked chicken aside.
STEP 6 – Now add some water, sugar, vinegar to the leftover gravy from the marinade.
STEP 7 – Add the green masala in a wide pan and boil it for 2-3 minutes.
STEP 8 –Then add the chicken pieces in it and cook the chicken in a covered pot for about 8-10 minutes.
STEP 9 – When the chicken is cooked well, switch off the heat.
Garnish with chopped coriander and capsicum rings and cover again for 2-3 minutes. Steam will cook the capsicum and soften it.  Serve it hot.  


Serve the hot and spicy green chicken gravy with chapatti, naan, paratha or steamed rice, some onion rings, lemon wedge and enjoy.

KOLHAPURI CHICKEN CURRY

The people of Kolhapur love their chicken with the spices. So much so that the Kolhapuri Chicken Curry is a fiery red curry from the land of Kolhapur, Maharashtra. This coconut base curry has always been a favourite dish at my place. It is known for its zesty spices and bright red colour. This chicken curry is indeed very spicy and only those used to heavy Indian foods have it without flinching. Basically this Marathi chicken curry recipe contains excess of oil and spice in the traditional sense. Bold and spicy is what defines this chicken curry, a very aromatic dish that heavily pronounces the flavors from south western part of India-Kolhapur, a recipe as vibrant and rich as the history of this ancient town. As I belong to Vidarbha region of Maharashtra, always used to prefer our Vidarbha style Kala Masala for my gravies which is prepared by my mom. So don’t have ready masala for making this chicken curry and don’t want to make it with other ready to use branded masala powders. So made the instant masala with the help of “ Google Baba” which is not that difficult to prepare at home. Here we need two types of masalas for this recipe which I have shared in detail with step-by-step pictures. I must say the two homemade masalas made the curry most delicious. If you are missing a few ingredients from the spice mix in your pantry, do not get upset. Indian cooking is very liberal and provides a very wide horizon that helps one to personalise the dish.  Though there are a lot of ingredients required to cook this recipe but it is very easy to cook chicken curry. Serve this with steamed rice, tandoori roti or chapatti and you are done!!!!!


INGREDIENTS:
1 kg Chicken 

OTHER INGREDIENTS:
1 Onion, sliced finely
2 teaspoon Ginger-Garlic Paste
2 teaspoon Kolhapuri Chutney[recipe is given below]
1 tablespoon Sesame Seeds
1 tablespoon Poppy Seeds
5-6 Black Peppercorn
1 “Stick Cinnamon
2-3 Green Cardamom
1 Black Cardamom
2-3 Cloves
1 Mace
2-3 tablespoon Grated Coconut [I used dry but most probably use fresh coconut]
1 tablespoon Melon Seeds
8-10 Dry Red Chillies
2 teaspoon Ginger-Garlic Paste
3 Medium Size Onions
¼ teaspoon Turmeric Powder
2 tablespoon Fresh Coriander
½ teaspoon Nutmeg Powder[optional]
Salt as per required
3-4 tablespoon Oil

KOLHAPURI CHUTNEY:
1 teaspoon Red Chilli Powder
1 teaspoon Coriander Seeds
½ teaspoon Cumin Seeds
½ “Stick Cinnamon
2 Cloves
½ teaspoon Fennel Seeds
1 tablespoon Grated Coconut [use Fresh Coconut]
1 Small Onion, chopped roughly
2-3 Garlic Cloves
1 tablespoon Coriander Leaves

METHOD:

For Making Kolhapuri Chutney:
STEP 1 – Heat a pan on low flame and dry roast coriander seeds, cumin seeds, cinnamon, cloves and fennel seeds. Keep this aside.
STEP 2 – Dry roast coconut until it turns brown. Remove from pan and keep aside.
STEP 3 – Now add little oil in the same pan and add chopped onion, garlic and coriander leaves and sauté well until it looks golden brown and crisp or raw smell vanish. Remove from pan and let it cool.
STEP 4 – Now add all ingredients in a mixer grinder with red chilli powder and grind into a fine paste. [see notes]

How to proceed:
STEP 1 – Dry roast sesame seeds, poppy seeds, black peppercorns, cinnamon stick, cloves, black and green cardamom, mace, cloves and keep aside.
STEP 2 – Roast grated coconut with melon seeds  until it looks brown in colour. Let it cool compeletely.

STEP 3 - Then add all ingredients in mixer pot and add red chillies to it and grind into a fine paste using little water.

STEP 4 – Now heat a wide pan, add oil in it, add chopped onions and ginger- garlic paste in it and sauté well and cook till it looks golden brown.

STEP 5 – Add ground fine paste in it and mix well and roast for about 2-3 minutes.

STEP 6 – Here add the chicken pieces in the pan, coat them well with the masala and cook on high flame for near about 4-5 minutes.

STEP 7 – Add enough water, kolhapuri chutney masala and salt cook the chicken for more 5 minutes.

STEP 8 – Then adjust the consistency of the curry and add more water.

STEP 9 – Cover the pan, let it cook on medium heat until cooked well.
STEP 10 – When the chicken is done add chopped coriander and your Kolhapuri Chicken is ready to serve. [see notes]


NOTES: *The recipe of kolhapuri chutney might yield about 2 tablespoon masala. Use just 2                           teaspoon from it and store the remaining. You can store it in air tight container in                               refrigerator and use for some other gravies.
              *Here I made it with little thick gravy, but if you want to make it dry, let it cook for some                   more time and let all the water evaporate.
             *Finally, heat oil in a tempering pan, add dried red chillies and roast for few seconds and                     pour this on the top of the curry. [optional] I skipped this step.


Monday, 9 October 2017

MASALA KARELA

People are not much fond of Karela because of its bitterness but after trying this delicious Karela Masala dish, they might change their choice. This recipe is prepared on my husband’s demand as he watched one video recipe on facebook. But it turned out super awesome and tasted too good. This easy-to-prepare dry sabzji pairs with chapatti, naan or any paratha of your choice. Karela is bitter but its health benefits are very sweet. It combats diabetes, pancreatic cancer, kidney stones and also helps in lowering cholesterol. Here is the easy, quick and delicious recipe with step-by-step pictures, better note down its recipe and make it and share your tips.


INGREDIENTS:
2 Medium sized Karela
2 -3 tablespoon Oil
1 Onion sliced
1 teaspoon Mustard Seeds
1 teaspoon Cumin Seeds
1 teaspoon Turmeric Powder
2 teaspoon Red Chilli Powder
1 tablespoon Coriander Powder
1 tablespoon  Aamchur Powder
3 tablespoon Besan/ Gram Flour
Salt as needed
1 teaspoon Rock Salt
¼ Cup Water
Chopped Coriander

METHOD:
STEP 1 – Wash and slice the karela in thin slices. Remove the seeds from it.

STEP 2 – Now sprinkle the rock salt over it and mix it well and keep it aside for 2 hours.

STEP 3 – Heat oil in a wide pan and add cumin and mustard seeds in it and let them crackle.

STEP 4 – After that add onion in it and sauté it till the raw smell vanish.

STEP 5 – Add turmeric powder, red chilli powder and dry coriander powder in it and mix well.

STEP 6 – Saute it for a minute. Then add besan flour in it and roast it well. [here I made a mistake, I added karela first and then gram flour].
STEP 7 -  After roasting besan flour well add karela slices in it and mix well and cook for 1-2 minute.
Then season it with salt and add water, mix well and cook.

STEP 8 – Cover it and cook it for next 10-15 minutes. Stir it occasionally, otherwise it will stick to the bottom and get burnt. So be careful.

STEP 9 – When cooked properly add aamchur powder in it and mix well and cook for next 1-2 minute.


STEP 10 – Switch off the flame
and sprinkle chopped coriander and serve it with chapatti or dal-chawal. 
Serve with chapatti, naan, paratha, dal and rice  or as an accompaniment with your meal.

CHICKEN HARIYALI KEBAB

Another recipe for all chicken lovers… its healthy, protein packed and full of vitamins and minerals. And the best part about this recipe that, chicken pieces are baked instead of deep fried. India is land of diversities, which is well portrayed in its culture and cuisine. A land where taste changes at every 100 kms. Hence, it has a wide spectrum of food. Here is an authentic Chicken Hariyali Kebab recipe which is not only quick but can be easily made at home.  Few days back, have some guests at home, who admire my food, so want to make something interesting to serve them. This dish is so delicious and easy to make and is baked using very less oil. Plus this will give you all variety of benefits- you will have chicken and goodness of spinach and fenugreek. Serve hot with lemon wedges, spiced onion and schezwan sauce or any dip of your choice.


INGREDIENTS:
500 gms Chicken Breasts / Boneless Chicken
2 tablespoon Ginger-Garlic Paste
2 tablespoon Thick Curd
1 teaspoon Lemon Juice
1 tablespoon Cream [optional]
Salt to taste
2 teaspoon + 2 tablespoon Oil [marination and cooking]
1 teaspoon Turmeric Powder
2 teaspoon Cumin Powder
3 tablespoon Coriander Powder  
1 tablespoon Kasoori Methi
1 Big Cup Mint Leaves
2-3 Green Chillies
½ Cup Fresh Coriander
8-10 Spinach Leaves

METHOD:
STEP 1 – Wash the chicken pieces, drain on colander to remove excess water.

STEP 2 – Then take a bowl, add 2 teaspoon oil, turmeric powder, cumin powder, coriander powder, salt and ginger- garlic paste.
Mix it well and make 1 st marination with it.

STEP 3 – Pour this mixture over chicken pieces and marinade it with it.

STEP 4 – Keep it aside for 10-15 minutes.
Blanch the spinach leaves and blend them in mixer grinder and make a fine paste.

STEP 5 – Meanwhile, make green paste with coriander leaves, mint leaves and green chillies. Add in spinach paste,  curd and cream and mix well. Don’t use water while making the paste. If needed only add 1-2 teaspoon water.
STEP 6 – Add kasoori methi in it and give a nice stir.


STEP 7 – Marinade chicken with this green paste and keep it aside for 1 hour.
If possible keep marinate longest time possible, 6 hours to 12 hours.[see notes]

STEP 8 – Now after 12 hours, arrange the marinated chicken pieces on an oven-proof baking tray.

STEP 9 – Drop little oil on every piece of chicken and bake them in pre-heated oven at 190 degree Celsius. Bake the chicken for 30 minutes, then flip the chicken pieces and drop oil as earlier and again bake for next 30 minutes.

STEP 10 – By this time, the chicken will be cooked but won’t get that burnt effect. To get that burnt effect, turn the grill mode on in your microwave oven or grill. Grill for 5 minutes on each side of chicken.


Serve the hot hariyali chicken kebab with mint chutney, schezwan sauce, onion-cabbage kachumber and lemon wedge. 


 NOTES:  *Keep the chicken bowl in refrigerator if marinating for more than 1 hour.