_________________I am Mrs. Kalpana Mhaske, a Home-Maker, from the city of 52-Gates, one of the famous heritage- destination of the world- Ajanta - Ellora Caves, Bibi-Ka- Maqbara (The Taj of Deccan) and Deogiri Fort. i.e. AURANGABAD. I admire cooking - tryout and innovate different cuisines. Basically, both of my gorgeous daughters are foodie, they have always encouraged me in the kitchen and forced to carve a Food Blog, that’s why, I am happy to share the makings with you. I am an artist too. Painting – especially, Canvas-Painting is my one more hobby. In total - Ours is an ART-FAMILY, my husband is an Architect. In the end, I keep the same belief with Louise Fresco - “ Food, in the end, in our own tradition, is something holy. It's not about nutrients and calories. It's about sharing. It’s about honesty. it’s about identity ”

Saturday, 4 December 2021

CHATPATA MAKHANA

Makhana mixture is one of the most popular of recent trending meals in the world. It is simple, it is quick, it tastes yummy. It's enjoyed by millions every day. 

Makhanas are popularly known as lotus seeds, fox nuts and phool makhana. Makhane/Makhana are actually the seeds of a particular type of lotus and is very nutritive in nature. 

 It’s actually the puffed lotus seeds or the puffed fox nuts that have high nutritional and medicinal values. It is  mostly grown in the states of Bihar in India.

Makhanas are packed with the goodness of protein, potassium, phosphorus, carbohydrates, fiber, magnesium, iron, and zinc. These essential nutrients make this munchy a perfect go-to healthy snack. One to two handfuls of Makhana should be ok and enough to give you positive health benefits. In India, specially in the North, people consider it as the food of the Gods.  That's why makhana is generally served during fasting as it contains all the required nutrients during fasting.


---->>>Here are few health benefits which will convince you to add them to your diet. (source - Google )

# It contains a good amount of carbs in each serving and is also rich in several micronutrients, including calcium, magnesium, iron, and phosphorus.

# Calcium, in particular, has been shown to support bone health, help reduce blood pressure, and decrease cholesterol levels.

# They are low in calories, making them an ideal snack for weight loss.

# In particular, makhana contains specific antioxidants like gallic acid and chlorogenic acid.

# Research shows that antioxidants play a key role in several aspects of health and may help protect against chronic conditions like heart disease, cancer, and type 2 diabetes.

# Makhanas are recommended for diabetics too due to their low glycemic index.

# Makhana is loaded with calcium, which help in maintaining the health of your teeth and bones. Consuming it will make your bones stronger as it fulfills the recommended calcium requirement of your body. It also helps people with joint problems and osteoporosis.

# Makhana is also good for people suffering from arthritis and other joint problems as it is rich in calcium. Consuming fox nuts will help in maintaining the calcium levels in the body.

# It is also a very rich source of protein. Vegetarians often rely on paneer and soya as a key source of protein. But those who wish to bank on protein from plant source can also turn towards makhana. A cup of dry roasted makhana has around 3.9 gm of protein, which is good enough to help build muscle mass and promote cell growth. 

# Consuming makhana will help inhibit the aging signs like wrinkles, fine lines and premature graying of hair. So, start eating fox nuts now.

# Rich in potassium, fox nut contains less of sodium and it is beneficial for people suffering from high blood pressure. Makhana helps in keeping the blood pressure in control and is one of the best way to maintaining the systolic blood pressure levels.

With this there are so many health benefits of consuming makhanas. So try to add them into your diet. They’re also sometimes  added to curries, side dishes or desserts. Makhana mixture is something that I've loved my entire life. Makhana is the new popcorn. It is quick, crunchy, healthy, tasty, easy to prepare, economical too.

 So do try it and share your feedback.


INGREDIENTS :

200 gm Makhana/ Lotus Seeds

1/2 teaspoon Red Chilli Powder

1/2 teaspoon Ginger Powder

1/2 teaspoon Fennel Seeds Powder

1/4 teaspoon Black Pepper Powder

1/4 teaspoon Black Salt

1/4 teaspoon Amchur Powder

1/4 teaspoon Chat Masala

1/2 teaspoon Cumin Powder

2 teaspoon Jaggery Powder

1 teaspoon Ghee 

Salt as per your taste

METHOD : 

STEP 1 - Heat a pan or kadai and add 1 cup of Makhana and dry roast them on very low heat for 4-5 minutes until they are crisp, keep stirring them in between so that Makhana does not burn


STEP 2 - To check if they are roasted properly just take one Makhana in hand and crush it, if it breaks nicely with a crunching sound that means they are done perfectly. Now transfer makhanas to a plate and let them cool.

STEP 3 - In a bowl, add all the spice powders and mix well. Our chatpata masala is ready.(see notes )

Also add jaggery powder and give it a nice mix.

STEP 4 - Heat the same pan/ kadai on low flame and add ghee. (see notes )


STEP 5 - Add the roasted makhanas, mix well and  sauté it on low flame for 2 minutes. This helps to coat the makhanas well with ghee.


STEP 6 - Now add the masala mix in it. Toss the makhanas for about 2 minutes until the spices are well coated.


STEP 7 - Let the Makhana cool to room temperature. 

You can serve it right away or store in airtight container for later use.


NOTES : * We are not adding our spices directly in ghee to avoid burning of them.

* Adjust salt and spices according to your preference.

*  We are using ghee to make it more healthy. If you like you can use oil too.

* Addition of jaggery gives it a nice texture and chatpata taste.

* Do everything in low flame to get the perfect texture and taste to our makhanas.

* You can use your favorite combination of spices as mentioned above.

* If you are making in bulk, do it in batches.

* Can be stored in an airtight container for a week at room temperature. 

* If they are exposed to air they get soggy and do not taste well.

Thursday, 2 December 2021

SAAGWALA CHICKEN / CHICKEN SAAG

 One of our favorite Indian chicken dishes is saagwala chicken / chicken saag . Every Indian restaurant has a version of  saagwala chicken. Juicy tender pieces of chicken drenched in a spiced spinach curry.  Saag Chicken is an everyday, hearty recipe that’s made with simple ingredients and pantry spices, that is unique in its flavors. This is hands down one of my favorite Indian dishes. It’s generally one of the healthier options as it has  no cream and plenty of spinach! This recipe features chicken pieces dunked in yummy silky smooth spinach curry. “Saag” is a Punjabi term used for all leafy green preparations made with either spinach leaves, fenugreek leaves, mustard leaves. And saag wala chicken or palak chicken/spinach chicken is an authentic Indian recipe made with fresh spinach leaves. It is a hearty, healthy and outrageously delicious dish  that even picky eaters won’t be able to resist this dish. The earthy flavours of spinach along with chicken and spices makes it more delicious. It is an excellent and tastiest way to include spinach in the diet. Make sure to add spices according to your taste. To give a rich taste and nutty flavour , cashew paste can be used.   This recipe goes by many different names – like palak murgh, palak chicken, saag murgh, saagwala chicken or saag chicken. They all mean the same. Palak means spinach, and murgh means chicken. This creamy, flavorsome, and nutrient-rich dish is sure to become your next family favorite. So give it a try and share your feedback.


INGREDIENTS : 

For Blanching - 

1 litre Water

1 teaspoon Sugar

Salt to taste

¼ teaspoon Baking Soda

2 medium bunch Spinach / Palak

½ Cup Coriander Leaves

2 Green Chillies

Ice chilled Water 

For Marination -

500 gms Chicken ( with or without bones )

Salt to taste

1 teaspoon Kasoori Methi

1 teaspoon Degi Red Chilli Powder

 For Curd Mixture -

½ Cup Curd

½ teaspoon Turmeric Powder

1 teaspoon Degi Red Chilli Powder (see notes )

1 ½ tablespoon Coriander Powder

A pinch of Cumin Powder

1 teaspoon Ginger- Garlic paste 

For Palak Chicken -

2-3 tablespoon Ghee

1 tablespoon Oil

1 teaspoon Cumin Seeds

1 Mace

1 Green Cardamom

2-4 Black peppercorns 

2-3 Cloves

1 large Onion, chopped

1 ½ Tomato, chopped

1 teaspoon Kasoori Methi

Curd Mixture

Marinated Chicken

Prepared Spinach paste / puree

½ Cup Water 

 For Rogan (Tadka) - 

1 tablespoon Ghee

2 Dry Red Chillies

2-3 Garlic Cloves, chopped

¼ tsp Degi red chilli powder ( or any which is available )

 For Garnish - 

½ inch Ginger, juliennes

Black peppercorns, crushed

Coriander leaves 

METHOD :

For blanching Palak - 

STEP 1 - Keep water in a deep pan, switch on the flame and let start water to boil.


STEP 2 - Add sugar, salt, baking soda.


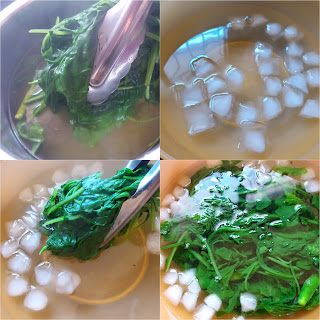
STEP 3 - Then add washed palak, coriander leaves and green chillies in it.


STEP 4 - Let it cook for a minute or two. ( see notes )


STEP 5 - Transfer it and immediately put in chilled ice water. It helps to stop further cooking.


STEP 6 - After cooling, transfer it on a strainer and remove all the water from it.


STEP 7 - Now, put it in a blender jar and puree it to smooth consistency. If needed, add 1-2 teaspoon water while pureeing. Keep this aside.


For Marination - 

STEP 1 - In a mixing bowl, add chicken pieces, kasoori methi, chilli powder and salt. Mix it well and keep aside for about 15- 20 minutes.


For Curd Mixture - 

STEP 1 - In a small bowl, add curd, turmeric powder, coriander powder, chilli powder, ginger- garlic paste, cumin powder and give it a nice mix. Keep it aside for further use.


For Making Palak Chicken - 

STEP 1 - In a heavy bottom pan, add ghee and oil. 


Heat it and add cumin seeds. Let the cumin seeds crackle, then add the whole spices. Roast till fragrant. (30 seconds )


STEP 2 - Add chopped onion and saute it on medium flame until light golden brown in colour.


STEP 3 - Add chopped tomatoes, roasted kasoori methi and roast well until tomato turns soft and mushy.


STEP 4 - Add curd mixture and give it a nice stir.


STEP 5 - Add marinated chicken, sear it on medium flame for 3-4 minutes.


STEP 6 - Add palak puree and mix everything well.


STEP 7 - Cook on medium flame for 15-20 minutes.


STEP 8 - Add 1/2 cup water, mix it and cover it with lid.


STEP 9 - Cook for another 8-10 minutes or until the chicken is cooked properly. Check salt and if needed add some more and cook 2 more minutes.


STEP 10 - You will see oil floating on the top. Switch off the flame.


STEP 11 - Transfer the chicken in a serving bowl.

For Tadka - 

STEP 1 - Heat ghee in a small tempering pan.

STEP 2 - Add finely chopped garlic and let it cook until nice brown and crispy.


STEP 3 - Add dry red chillies and roast for a minute.

STEP 4 - Add red chilli powder and mix well.


STEP 5 - Pour this tempering / takda on chicken saag.


STEP 6 - Garnish it with some ginger juliennes, black pepper powder and coriander leaves and serve it hot.


Serve this as a side for Roti or Chapatti. Also tastes good with naan, tandoori roti or paratha. Alternatively, even better, mix it with Rice for a delicious spinach rice.

NOTES : * I don't have Degi Red Chilli Powder, so I used the one I have.

* Avoid blanching or cooking spinach for a long time. 

* Cooking the greens for a longer time tend to lose its nutrition and beautiful green color.

* You can reduce or increase the spices according to your taste.

Recipe inspired by - Chef Ranveer Brar.

Wednesday, 1 December 2021

DORA CAKE / DORAYAKI

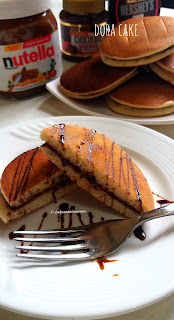
 Is your kids fan of Doraemon, famous cartoon character? Then they must know about Dora cakes. Doraemon love to eat dora cakes and kids too love them.  DORA CAKE , Doraemon's favorite food also known as  Doriyaki, which is a Japanese  style sweet, fluffy golden pancake sandwich with a filling made of gooey sweet treats like chocolate spread or jam. It is a kid’s delight, simple to make and needs very few ingredients available in your pantry. It’s popularly known as Doraemon’s Dora Cake. 

My girls, when they were little, loved watching a Japanese cartoon series called Doraemon. Ever since Doraemon and Nobita's story has hit the TV channels, kids are crazy about this cartoon character and what more, they would want everything which has doraemon in it. So I thought to ease out the tension of all the mothers and help them to make Dora cake for their kids. Dora cakes can also be prepared as breakfast / evening snacks or to settle the little hunger pangs of the little ones. Dora cakes are loved not only  by kids but even adults, such as me, love it.

 I made this Dora cakes without using eggs and it’s very easy to make these cakes. I tried to keep this eggless dora cake recipe as simple as possible. The right consistency of the batter is very important, since you do not want your pancakes to be dry and hard. You can easily make these at home and your children will surely be loving it.  Dora cakes can be made from the basic ingredients and can be served as breakfast, dessert and even as snacks. For this recipe, I have used all-purpose flour (maida) but if you are planning to give Dora cakes a healthier touch then you can also make with whole wheat flour instead of all-purpose flour. 

Although it is a recipe for kids, the secret is that even I love this recipe. Lets see how to make this fluffy Dora cake. Hope you will give this a try and let me know how it turns out for you.


INGREDIENTS :

1 Cup Refined Flour /Maida (see notes )

3/4 Cup Powder Sugar

3 tablespoon Condensed Milk

1/2 teaspoon Baking Powder

1 teaspoon Honey

1 teaspoon Vanilla Essence

1/2 Cup Milk

1 tablespoon Butter

For Filling :

Few tablespoons of Hazelnut Chocolate Spread / Chocolate Ganache ( see notes )

METHOD :

STEP 1 - In a mixing bowl, add sifted flour, powder sugar, baking powder, condensed milk, vanilla essence, honey and melted, room temperature butter.


Add milk and mix it using a hand whisk and make a lump free, free flowing batter 


STEP 2 - Cover it and keep this batter aside for 10 minutes.

STEP 3 - Heat a non stick pan on medium heat. Drop 2-3 drops of oil + water and spread all over with a tissue. With another tissue, wipe completely. The dry oil free surface of the pan ensures the characteristic evenly browned surface of the Dora cakes.


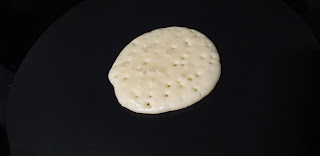
STEP 4 - Pour ¼ cup of batter on the pan. No need to spread the batter, it will spread and take shape on its own. Cover it with a lid.


STEP 5 -  Cook until the colour changes to golden brown. You will see the bubbles on the surface. It takes about a minute and a half.  ( see notes )


STEP 6- Gently flip the pancake using a silicon spatula and cook from the other side for about 30 seconds.


STEP 7 -  Repeat the same process and make all the pancakes with the rest of the batter.


STEP 8 - When done, transfer and keep it on a plate. 


STEP 9 -  Make all the pancakes and let them cool to room temperature.


STEP 10 - After cooling, take 1 pancake and spread some filling evenly on the light colour side (chocolate spread/ chocolate ganache) . ( see notes )

STEP 11- Take another pancake and place it. The brown side must be from outer side.


STEP 12 -  Slightly press it and Dora Cake is ready.  This yields 10 -12 pancakes and 5 - 6 pancake sandwiches.


STEP 13 - Likewise, make all the dora cakes with the rest and serve.


NOTES : * Here I have used all purpose flour but you can use whole wheat flour to make it more healthy.

* To serve, you can liberally spread the filling of your choice.

* You can use chocolate spread, hazelnut spread, jam or even peanut butter. 

* Keep the heat on medium / medium low throughout. They go from brown to black really quick!