_________________I am Mrs. Kalpana Mhaske, a Home-Maker, from the city of 52-Gates, one of the famous heritage- destination of the world- Ajanta - Ellora Caves, Bibi-Ka- Maqbara (The Taj of Deccan) and Deogiri Fort. i.e. AURANGABAD. I admire cooking - tryout and innovate different cuisines. Basically, both of my gorgeous daughters are foodie, they have always encouraged me in the kitchen and forced to carve a Food Blog, that’s why, I am happy to share the makings with you. I am an artist too. Painting – especially, Canvas-Painting is my one more hobby. In total - Ours is an ART-FAMILY, my husband is an Architect. In the end, I keep the same belief with Louise Fresco - “ Food, in the end, in our own tradition, is something holy. It's not about nutrients and calories. It's about sharing. It’s about honesty. it’s about identity ”

Monday, 23 April 2018

EGGLESS DOUBLE CHOCOLATE BROWNIE

These brownies are the ultimate dessert for any chocolate lover…!! Rich, fudgy and so decadent, you just need this recipe in your life. Chocolate….my daughter loves anything with chocolate and I tried this recipe only for her. The one food she just cannot resist. These chocolate brownies are quick and easy to make. They are super chocolatey and go perfectly with some ice cream as a decadent dessert. So do try this chocolatey, gooey and classic brownie recipe that can be made using very few ingredients which are available in your pantry.

INGREDIENTS:
1 Cup All Purpose Flour
¼ Cup Cocoa Powder [unsweetened]
½ teaspoon Baking Soda
¼ teaspoon Salt
½ Cup Unsalted Butter [at room temperature]
1/3 Cup Brown Sugar
¼ Cup Granulated Sugar
1 teaspoon Vanilla Extract
1-1/2 tablespoon Milk
1 Cup Choco chips
METHOD:
STEP 1 – Take medium size bowl and sift in all purpose flour, salt, cocoa powder and baking soda.
Mix all with a fork very well and keep aside.

STEP 2 – Take another mixing bowl, add brown sugar, granulated sugar and butter in it.

STEP 3 – With an electric beater, beat well for 2-3 minutes till sugar and butter are mixed
and it becomes soft and slightly fluffy.

STEP 4 – Pre-heat the oven at 375 degree F or 180 degree C for 10 minutes. Line a 7 inch baking tray with butter paper and keep ready.
STEP 5 – Now add vanilla extract, flour mix and milk to the butter mixture.

 Mix with a fork till all ingredients get combined well.
Brownie batter is ready. [see notes]
STEP 6 – Now add chocolate chips in the batter and mix well. Keep some for topping.

STEP 7 – Now pour the batter in the prepared cake tin. Spread it evenly and tap the tin once or twice on the kitchen platform.

STEP 8 – Sprinkle the remaining chocolate chips o the top and press them slightly with the back of the spoon.

STEP 9 – Bake the brownie for 25-30 minutes. Start checking after 23 minutes with the wooden tooth pick if it done or not. Insert it in the middle and if it comes out clean, switch off the oven. [see notes]

 STEP 10 - Take out the brownie and let it cool for 5 minutes. Carefully take it out with the butter paper and let it cool down.

STEP 11 - Cut into desired shape and size and serve it.

Enjoy your homemade double chocolate brownie with a hot cup of tea or coffee.

NOTES: *The batter is slightly thicker than the cake batter.
              *The baking time may vary a little bit according to your oven.


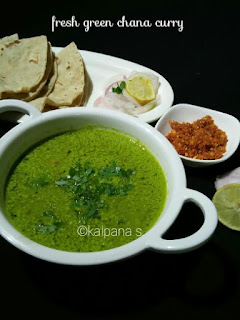
HARBARYACHE SOLE / FRESH GREEN CHANA AAMTI

Couple of weeks back, I had bought some fresh green chana  [choliya / fresh green chickpeas] and I had made different dishes with it. Hara chana, literally means green gram. A winter feast. We would wait all year to snack these crunchy, fresh chana. Nature makes them available in tiny little pod, which are a pain to open…!!! But once you have cracked the puzzle, it’s a world of green goodness inside. My favourite to make this aamti which is very quick and simple. My mom used to make it when hara chana is in the season and it tasted yummm. You can also make veg hare chane ke kebab or Choliya kofta curry with it as per your convenience. All the above mentioned dishes tastes different and can be made using different techniques. The curry would go well with chapatti, jowar bhakri or simply with steamed rice.


INGREDIENTS:
! Cup Fresh Green Chana
10-12 Gralic Cloves
½ “ Ginger Piece
1-2 Green Chilli
¼  teaspoon Turmeric Powder
1 Teaspoon Red Chilli Powder [accordingly adjust]
Salt as needed
½ teaspoon Mustard Seeds
½ teaspoon Cumin Seeds
2 tablespoon  Oil
1 teaspoon  Chopped Coriander
1 teaspoon Goda Masala Coriander Powder
METHOD:
STEP 1 – Heat ½ teaspoon oil in kadai. Add green chillies, green chana, cumin seeds and garlic and fry it on medium flame for 3-5 minutes.

STEP 2 – Now let it cool for some time,
then add salt according to taste and grind it to fine paste with little water.

STEP 3 – Heat the remaining oil in a pan, add mustard seeds and let them crackle.

STEP 4 – Add the ground chana mixture in it,  saute and cook it for 3-4 minutes stirring occasionally.
STEP 5 – Now add turmeric powder, red chilli powder, goda masala, coriander powder and salt and mix well.
Add water and let cook the mixture for another 1-2 minutes.

STEP 6 – Add more water as needed to achieve the desired consistency. Check the seasoning and adjust if needed.

STEP 7 – Let the aamti cook for 4-5 minutes on low flame. Stir it occasionally.

STEP 8 – When it starts boiling, add chopped coriander and switch off the flame.
Aamti is ready to serve.


Serve it hot with chapatti, jowar bhakri or rice and enjoy.


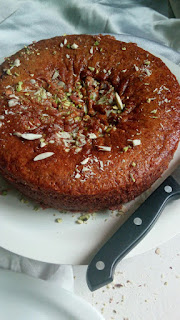
EGGLESS THANDAI MAWA CAKE

Mawa cake is a Parsi Cake made using mawa, evaporated milk.  Using mawa in the cake gives a dense  and moist texture to the cake with caramalised flavour. This cake totally gives you a feel of Indian flavours. Here I added thandai masala powder in it with mawa which is again Indian and gives the cake a rich taste. I even tried cupcakes which I will post after this recipe. Few days back hubby bought 1 kg mawa which was very good quality, soft and crumbly. So tried mawa cake , mawa cupcakes and few sweets with it. You can make your own mawa at home too from milk. It takes lots of efforts and is time consuming too. But choice is yours. All the mawa , nuts, rose syrup gave it a rich mithai feel but you can taste a dense rich cake in every bite. When served chilled it could be real summer soother. So do try this cake this summer holidays and let me know your experience. Hope you all like this recipe.  
 INGREDIENTS:
2 ¼ Cup All Purpose Flour
¼ Cup Corn Flour
1 ½ tablespoon Thandai Masala mix [I used homemade but you can use store brought]
½ teaspoon Salt
1 ½ teaspoon Baking Soda
2 teaspoon Baking Powder
½ Cup Mawa/ Khoya, grated fine or crumbled
1 ¾ Cups Sugar
½ Cup Yogurt, at room temperature
½ Cup Cooking Oil
1 teaspoon Rose Essence / Rose Water [optional]
1 Cup Milk, lukewarm
For Garnishing:
2 tablespoon Almonds, roughly chopped
2 tablespoon Pistachios, roughly chopped
METHOD:
STEP 1 – Take a large mixing bowl, add all purpose flour, salt, baking soda, baking powder and sift twice.
Mix well with a fork. Corn flour needs to be well incorporated with all purpose flour.
STEP 2 – Add thandai masala mix in it and mix well with a fork again.

STEP 3 – Pre-heat the oven at 375 degree F or 180 degree C. Grease a 7 inch cake tin with butter and line it with butter paper. Keep it aside.  
STEP 4 - In another bowl, add yogurt, oil and sugar
and beat with an electric beater and mix on high speed for about 2 minutes.
Sugar will be dissolved and the mix will be lighter.

STEP 5 – Now add mawa and rose essence and beat it for another 1-2 minute.

STEP 6 – Now start adding dry mixture and milk in it alternatively in small batches and mix well.
Make sure that the ingredients of cake batter are well combined.

STEP 7 – Pour the cake batter in a greased and lined cake tin.
Sprinkle some chopped nuts on the top.
Tap the pan on the counter few times to make sure that the batter is well settled.

STEP 8 – Place the cake tin in the middle rack of the oven and bake it for 40-45 minutes on 180 degree C. Start checking after 40 minutes. [see notes]
STEP 9 – Insert a tooth pick in the middle of the cake, if it comes out clean, your cake is ready. Otherwise bake it for another 3- 4 minutes. It looks brown in colour when fully baked.
STEP 10 – Rest it for 5 minutes in the oven and then take it out. Again let the pan rest for 5 minutes and then carefully remove the cake from the cake tin. Place it on cooling rack/ wire rack for next 5 minutes.
STEP 11 – Cut in to desired size and shape and enjoy.
Serve it with tea or coffee. This cake taste amazing when served hot. You can microwave for few seconds every time before serving.

Store in an air tight container when cooled completely.[see notes]   

 NOTES: *All ovens are different and the baking time will vary.
               *If want to use the next day, please store it in the refrigerator because it is with mawa. 

MANGO THOKKU

Summer is just started and this year I can't stop myself from making some special recipes with raw and ripe mangoes. Last year I lost both my parents so was in no mood for anything. This season, few days back, I tried this Mango Thokku recipe which comes out so delicious and my husband also likes it a lot. So again prepared my second batch and posting here in my blog. Mango Thokku is a tangy, spicy, chutney like condiment similiar to South Indian pickles. While Thokku can be made with all sorts of things like Onion, Tomato, Coriander, Mint and whatever else that catches your fancy, mango thokku has got to be the most popular.This is an easy to make pickle mildly sweet, tangy and spicy. No articfial colours or preservatives added in this pickle. So simple to make in minutes and can be stored for months on refrigeration. Perfect with curd rice, sambar rice and chapatis.It is perfect recipe for this mango season when we get mangoes in abundant. Cooking mangoes itself makes the raw mango slightly sweet so adding jaggery in this recipe is purely optional. For more spicy and tangy version you can avoid addition of jaggery in this thokku recipe.
INGREDIENTS:
2 Raw Mango / Kachhi Kairi
Salt as needed [see notes]
1 tablespoon Red Chilli Powder
1 teaspoon Jaggery
½ teaspoon Mustard Seeds
Asafoetida, a pinch
½ teaspoon Fenugreek Seeds Powder [see notes]
4-5 tablespoon Oil [sesame oil for perfect flavour]
METHOD:
STEP 1 – Wash, pat dry the raw mango and then grate it. Keep aside.
STEP 2 – In a thick bottom kadai, add oil and let it heat well.
STEP 3 – Then add asafoetida and mustard seeds in it and let them splutter.
STEP 4 – Add grated mango in it and mix well and cook for 7-10 minutes on medium heat. [see notes]
STEP 5 – Then add salt, chilly powder, jaggery in it and give a nice stir. Cook further until you see oil bubbling at the edges. Keep stirring the mixture in between.
STEP 6 – Once you see the oil floating on the top of the pickle, switch off the gas.
STEP 7 – Then add roasted and ground fenugreek powder and mix well.
STEP 8 – Cool it completely and then transfer in a clean and dry glass jar.
Serve it as a supplement with your meal and enjoy. It will stay good for over a month or so when stored in refrigerator.

NOTES: *Use Rock salt instead of white.
               *Dry roast fenugreek seeds and grind coarsely.
               *Here after adding grated mango in oil, you feel that the oil has been completely absorbed and won’t be enough. But don’t add more oil. It will eventually float on top once it starts cooking.
Oil on the top ensures the pickle stays long and fresh.
              *Jaggery is added to cut the sourness of raw mango. You can skip it.