_________________I am Mrs. Kalpana Mhaske, a Home-Maker, from the city of 52-Gates, one of the famous heritage- destination of the world- Ajanta - Ellora Caves, Bibi-Ka- Maqbara (The Taj of Deccan) and Deogiri Fort. i.e. AURANGABAD. I admire cooking - tryout and innovate different cuisines. Basically, both of my gorgeous daughters are foodie, they have always encouraged me in the kitchen and forced to carve a Food Blog, that’s why, I am happy to share the makings with you. I am an artist too. Painting – especially, Canvas-Painting is my one more hobby. In total - Ours is an ART-FAMILY, my husband is an Architect. In the end, I keep the same belief with Louise Fresco - “ Food, in the end, in our own tradition, is something holy. It's not about nutrients and calories. It's about sharing. It’s about honesty. it’s about identity ”

Friday 11 August 2023

ZERO OIL CHOLE MASALA in PRESSURE COOKER

 The food from the state of Punjab is extremely popular throughout India and one can find many restaurants catering to this world famous cuisine. I am sure everyone  is fond  of the world famous combo food Chole-Bhatura but as it’s high on oil and calories we eat that once in a while. As if it's not enough, that the traditional chole recipe is usually cooked with loads of oil and served with calorie laded bhatura s/ pooris.

Today I am going to share this extremely popular combo food recipe cooked in my style and in a healthy way. I guess all Indian food blogs will surely have the recipe to this, so one might ask, what’s new here? New is that, I have still not read any one contributing to a NO OIL CHANA, yes this recipe has absolutely ZERO OIL but is high on taste and one surely does not miss out the oil factor. Here's the healthy zero oil variation without unnecessary calories . You will be amazed how something so simple to make can be so delicious to eat!!

Everyone wants to eat healthy food without oil and ghee, but due to taste, everything is not eaten.  But denying this, today we are going to make chickpeas without ghee and oil.  Now because it is made without ghee and oil, then it will be beneficial for health.  Also, due to its taste, you will not feel even for a moment that it is a healthy dish made without ghee and oil. Chole Bhature is  all-time favorite dish of  both my daughter's ever since they were kids. I used to be the happiest mom whenever I make chole bhature for them. And the other interesting part of this recipe is we are making it in pressure cooker.


 Chickpea or chole is such a versatile ingredient used in different ways, across the world. Making this curry in a pressure cooker will save your time. The long cooking time allows the spices to be properly absorbed by the garbanzo beans and the gravy. Another benefit of using a pressure cooker is that it is hassle-free because you are making this side dish in a single pot. As the name suggests, Hero ingredients of the recipe are chickpeas and other ingredients used here are few whole spices, onion, chole masala powder and other regular spices. If you don't have chole masala powder then you can use garam masala powder. This recipe is a pressure cooker recipe and pretty easy to prepare. The maximum amount of time required here to soak chickpeas. You can even use canned chickpeas too. If you love to have healthy Indian curries, you will love this style chana masala. The recipe is one-pot and comes together in under 30 minutes.

REASONS TO LOVE THIS OIL-FREE CHOLE RECIPE -

📝100% oil-free recipe

📝very flavorful

📝super delicious

📝easy to prepare

📝perfect tiffin box recipe

📝ingredients are easily available

When served with one meal of your day is thankfully guilt-free. This is one of the easiest Indian dishes you can make, and a great one to start out with if you are new to Indian cooking. No-Oil chole recipe is delicious and healthy. Chole masala recipe is a spicy side dish often served and can go best with poori or batura. This curry goes well with any type of flatbread, pancake, roti, chapati, fried rice, jeera rice or steamed rice, etc. 

A quick pressure cooker zero oil chole masala with detailed step-by-step pictures and video. You will be amazed how something so simple to make can be so delicious to eat!!   This recipe has 0% oil yet super delicious. If you try this recipe please let me know by clicking on the stars ★ in the recipe card to let us know your feedback!  Also click and do share the recipe pic and with us on Social Media Channels - Instagram and Facebook with hashtag #Kalpana's La Cucina.

📌📌 Watch the full video recipe here 📌📌

INGREDIENTS:

1 Cup Chickpeas / Chole / छोले 

2-3 medium Onions, chopped / कांदे 

1 tablespoon Ginger Paste/ अद्रक पेस्ट 

1 teaspoon Garlic Paste / लसूण पेस्ट 

1 teaspoon Ginger Juliennes 

2-3 Bay Leaf/ तमालपत्र 

2 Green Cardamom/  वीलायची 

1 teaspoon Black Peppercorns  काळे मिरे 

1/2" Cinnamon Stick/ दालचिनी

1 teaspoon Carom Seeds / ओवा 

Around 500 ml Water

1 tablespoon Tea Powder चहा पावडर 

1/2 teaspoon Baking Soda ( optional )

1 tablespoon roasted Gram Flour / भाजलेले बेसन 

1 tablespoon Coriander Powder/ धना पावडर

1 tablespoon Red Chilli Powder /लाल तिखट

1 teaspoon Cumin Seeds Powder/ जीरा पावडर

3-4 slit Green Chillies / हिरवी मिरची 

2 tablespoon Chole Masala  छोले मसाला

1 teaspoon Aamchur Powder /आमचूर पावडर

1 tablespoon Anardana / सुखा अनारदाना

1 teaspoon Kasuri Methi 

Salt as per taste

METHOD :

STEP 1 -  Take a deep bowl , add chickpeas and wash them with tap water. Soak chana for 6-7 hours or overnight. 

STEP 2 -  After soaking, strain excess water and wash them with fresh water.


STEP 3 - In a pan, boil 2 cups water 1 tablespoon tea powder for 2-3 minutes to make tea concoction. Strain and keep it aside for further use.( see notes )


STEP 4 - Heat a pressure cooker on medium heat, add chopped onion and pinch of salt and cook onions till the colour changes to golden in colour. 


STEP 5 - Add a splash of water while cooking the onions if it sticks to the bottom of the pressure cooker.


STEP 6 - Add soaked chickpeas, salt, ginger- garlic paste, carom seeds, whole spices, 


STEP 7 - Add strained tea concoction and some more water and mix well. ( see notes )


STEP 8 - Stir and cook for 2 minutes. Add 2 1/2 cups of water. Now, the mixture should become thinner. However, once the chickpeas become cooked, the gravy should thicken. 


STEP 8 - Add baking soda, stir it once and close the cooker with its lid and place cooker on medium heat. Cook till you hear 5 whistles and simmer for 10-15 minutes.

STEP 9 - Switch off the flame and open the lid once the pressure releases naturally. Check whether chickpeas have cooked properly. If not, cook for more time.


STEP 10 -  Stir the mixture once. Once again put it on the heat and bring it to boil.


STEP 11 - Add roasted besan, coriander powder, red chilli powder, cumin seeds powder, slit green chillies, ginger juliennes, salt and chole masala. [ I missed pics of adding coriander powder and besan.]


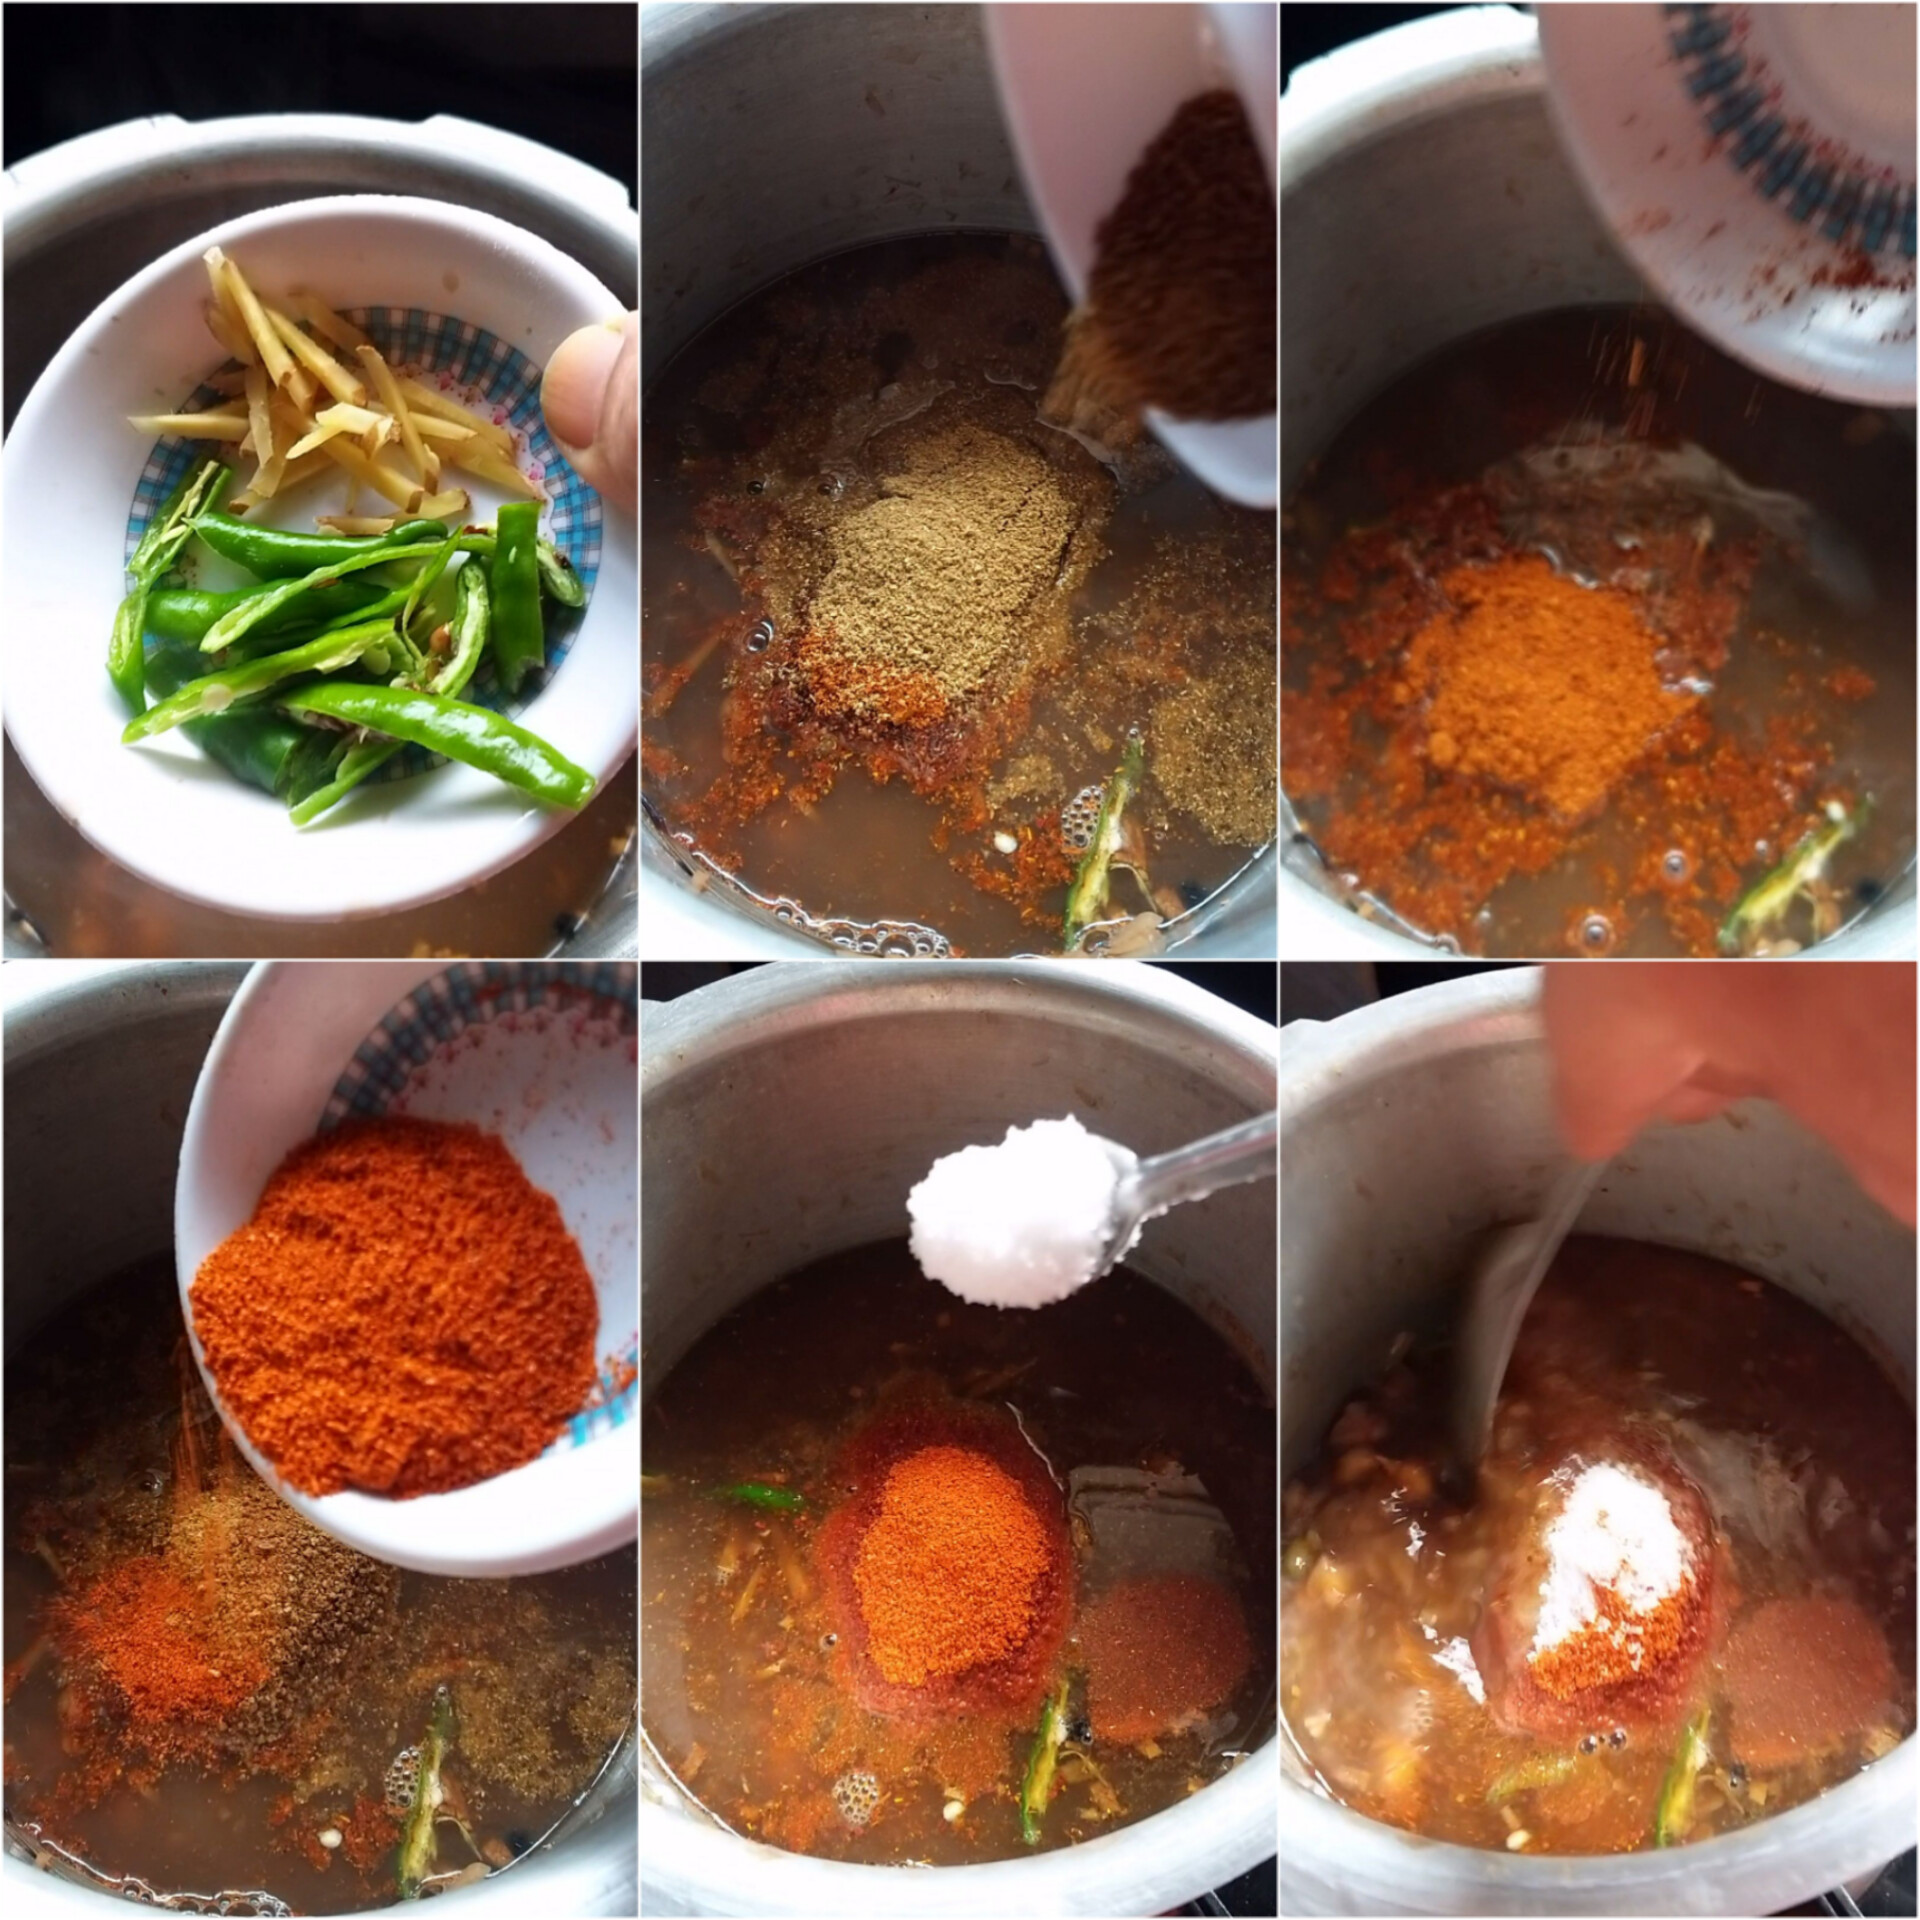
STEP 12 - Give it a nice mix.


STEP 13 - Add amchur powder red anardana and cook for 8-10 minutes. 

STEP 14 - If need to adjust the consistency, add some hot water and adjust the consistency of the gravy.


STEP 15 - Bring it to a boil, add kasuri methi and mix it well.

STEP 16 - Cook for another 2-3 minutes. Switch off the flame.


STEP 17 - Garnish with chopped coriander leaves and your zero oil chole is ready to serve.


Punjabi Chole Masala tastes best with bhature. But today we relished it with Jeera Rice and everyone just loved it. However, you can also serve it with steamed rice, puri, tandoori roti, paratha or kulcha.

NOTES - * Make sure to soak chole overnight in enough water. Wash them nicely before soaking.

* You can use garam masala powder instead of chole masala powder. if using, add 1 teaspoon of garam masala powder ONLY as garam masala has a very strong flavour.

* You can use canned chickpeas as well.

 * Add sufficient water and make sure that water level is 1" above the chole.

* Make a tea decoction with using a tea bag/ tea powder. It is used only to give chole a dark color, they add nothing to the taste. You can skip them if you don’t care about the color of the chole. You can even use dried amla (gooseberry) to get this dark color.

Tea Decoction - 

📝 Boil 2 cups water and add 1 tablespoon tea powder. 


📝Let it boil for 3-4 minutes.


📝 Strain it strainer and ready to use in your recipe.

* Tea decoction is totally optional .

* The flame should be low while cooking onion and adding ground spices. Add a dash of water if it starts to burn.

*Bite chole to check it there are properly cooked.

* You can mash a little bit of chole after adding it to the gravy to get nice thick consistency.

* You can increase or decrease the quantity of water according to your preference.

* The recipe is one-pot and comes together in under 30 minutes.

Wednesday 9 August 2023

ZHANZHANIT MISAL PAV / झणझणीत मिसळ पाव

Spicy MISAL PAV is street food delicacy in Maharashtra. Tangy sour and spicy snack. Nowadays, many office canteens serve it for breakfast. Misal Pav is one of my favourite snacks or quick fix meal. It is super spicy, has a ton of texture and every bite is full of  flavour. I am sharing an easy recipe to make this at home using sprouted moth beans / sprouted moong beans.


Mumbai is famous for it's variety of street foods. Misal Pav is one of them, similar to the Mumbai Pav Bhaji and Vada Pav.  You can find people relishing this spicy meal with drinks at Mumbai beaches. Both Juhu and Girgaum chowpatty are filled with stalls full of street food. There are slight variations to this simple recipe depending on the place. For example, Recipe of Puneri misal is slightly different from recipe of Kolhapuri misal pav. It contains Poha or rice flakes instead of pav. Mamladar Misal served in and around Thane is much spicier. Dahi misal is served with yogurt to enhance its flavor. You can enjoy this at any Jhunka Bhakar kendra. These food stalls also help vendors from poor financial background make a living and provide fresh food to mill workers and daily wagers.

Misal Pav is a wholesome meal, that can be enjoyed as a nutritious breakfast or brunch. Misal is a spicy sprouts curry (usal) cooked with onions, tomatoes, ginger, garlic and coconut. This is then topped with onions, lemon juice, farsan and enjoyed with pav (dinner rolls).You can make with storebought goda masala but I made the masala from scratch. There are several ways to make misal pav, I follow this method as its simple and gives great taste too.


Here, we serve this misal recipe along with 'Pav' or 'Laadi' or Bun. You can serve with buns/ breads from the market.If you tried this recipe, Click on the stars ★ in the recipe card to let us know your feedback!  You can also click the recipe pic and share on Instagram and Facebook with hashtag #Kalpana's La Cucina.

📌📌 Watch the full video recipe here 📌📌


INGREDIENTS: 

For making fresh masala:

2 teaspoon Oil

10 Black Peppercorns

4 Cloves

2 tablespoons Coriander Seeds

1 teaspoon Sesame Seeds

1/2 teaspoon Cumin Seeds

2 Dry Red Kashmiri Chillies

1 Med. Onion, sliced

2 tablespoons Coconut Powder

1 Med. Tomato

For Misal :

1 Cup sprouted Matki

1/2 teaspoon Cumin Seeds

1/2 teaspoon Mustard Seeds

Pinch of Asafoetida

1 Onion, chopped

Few Curry Leaves

1 tablespoon Green Paste (green chillies, ginger and garlic)

2-3 tablespoons Kashmiri Chilli Powder

1 tablespoon Coriander Powder

1/2 teaspoon Turmeric Powder

1 tablespoon Amchur Powder

1 tablespoon Garam Masala

Salt as per taste

2-3 tablespoons Oil

For Serving:

Ladi Pav

Farsan

Finely chopped Onion

Finely chopped fresh Coriander

Lemon Wedges

METHOD:

 Preparation :

STEP 1 - In a bowl, take sprouted matki and add 1/4 teaspoon turmeric powder and 1/2 teaspoon salt. Mix it and pressure cook for 1 whistle.


STEP 2 - Let the pressure release.


For Making Fresh Masala : 

STEP 1- Heat a pan with 2 teaspoon Oil.

STEP 2 - Add whole spices, coriander seeds, cumin seed and sesame seeds and  roast for 1-2 minutes.


STEP 3 - Then add dry red chilli, sliced onion and roast it till onion turns light brown.


STEP 4 - Add coconut powder and roast for more 1-2 minutes.


STEP 5 - Transfer it to a plate and let it cool down.


STEP 6 - Add this mixture to mixer pot with chopped tomato and blend it to form a fine paste. Keep it aside.


For Making Misal :

STEP 1 - In mortar pestle add green chillies, ginger and garlic and make a coarse paste/ thecha.


STEP 2 - Heat 3-4 tablespoons oil in a pan.


STEP 3 - Add mustard seeds, cumin seeds and let them crackle.


*STEP 4 - Add pinch of asafoetida and curry leaves.


STEP 5 - Add chopped onion, curry leaves and roast it till raw flavour vanishes.


STEP 6 - Add green paste/ thecha and roast it well with onion on low flame.


STEP 7 - Now add freshly ground masala paste, mix it well and roast well for 3-4 minutes.


STEP 8 - Add dry spice powders and mix well.


STEP 9 - Add cooked sprouts and mix well.


STEP 10 - Add 2-3 cups of water, salt , mix it and let it cook.


STEP 11 - When it starts to boil, cover it and cook for another 5-7 minutes on low flame. You will see oil floating on the top.


STEP 12 - Switch off the flame and your misal is ready to serve.


HOW to Serve : 

STEP 1 - In a serving plate add misal .

STEP 2 - Add some farsan on it.


STEP 3 - Top it with some finely chopped onion and coriander leaves. Drizzle some lemon juice and serve it with pav. Always serve it when it is piping hot and enjoy...😍


NOTES : * This recipe requires 2 cups of sprouted moth beans. If you already have the moth beans, you can skip the sprout making process below.

* For making sprouts, wash and soak ½ cup of Moth beans or Matki overnight.

* If you don't have moth beans, its ok you can use green gram dal too.You can even use mixed sprouts.

* If your tomatoes are not very sour then add 1 tsp tamarind pulp.

* Reduce chilli powder if you prefer a mildly spiced curry.

* The gravy is little runny only.The oil on top should be poured on top while serving the curry.

* Squeeze lemon while serving.

* You can have the gravy with rotis too.

* You can even make the spice mix in bulk and store it.The measures mentioned here are for this recipe and you can add it fully.

Tuesday 8 August 2023

EGGLESS WHOLE WHEAT BANANA BREAD/ CAKE

 I love baking bread at home. So, made this Eggless Whole Wheat Banana Bread today. I wanted to try and make this bread more healthy without using all purpose flour and butter.  It is a soft, crumbly bread and your children will love this sweet healthy treat. Bit because we have used  whole wheat flour, it has milder flavour and pale color. This whole wheat banana bread brings warmth in the kitchen and it is perfect for sweet breakfast. Whole Wheat Banana Bread Eggless is moist and delicious and infused with sweet banana and choco chips. This recipe is very simple and easy to make.


While made without butter or all purpose flour, this 100% whole wheat banana bread tastes just as flavorful and moist as the regular banana bread. In this healthy banana bread recipe, swap butter with any vegetable, unflavoured oil and all-purpose flour with whole wheat flour, and if you want you can replace the refined sugar with honey/ jaggery powder. My whole wheat banana bread completely blew my mind. To be honest, I didn’t have high expectations. This loaf was merely a way to get rid of 2 overly ripe bananas. You can use frozen and thawed bananas in this recipe. I have earlier posted a recipe of Eggless Banana Bread with all purpose flour.


 This banana bread is wholesome, healthful & hearty. Its extra moist and not overly sweet, so the banana flavor shines. And it takes hardly 10 minutes preparation. This banana bread is very moist and because of bananas, it will stay at room temperature for only a day or two. But store it in the air tight container and keep in the refrigerator for up to a week.

📌📌 Watch the video recipe here 📌📌


INGREDIENTS:

2 ripe Banana

1/2 Cup Sugar

1 Cup Whole Wheat Flour

1/2 Cup Curd

1/2 Cup Milk 

1/4 Cup Vegetable Oil

1/2 tablespoon Corn Flour

1 teaspoon Baking Powder

1/2 teaspoon Baking Soda

1/3 Cup chopped Chocolate/ Choco chips

METHOD :

STEP 1 - Prepare a 7" cake tin and keep aside. Pre-heat oven at 180°C for 10-15 minutes.


STEP 2 - In a mixing bowl, take two peeled bananas and mash them with the help of masher/ fork. 


STEP 3 -  In that, add sugar, oil and curd and whisk it well using a hand whisk until well combined.


STEP 4 - Sift in dry ingredients - whole wheat flour, corn flour, baking powder, baking soda and mix well using a whisk.


STEP 5 - Add milk in small batches, mix to make a smooth flowing, runny batter.


STEP 6 - Add banana essence and chocolate/ choco chips/ nuts and give it a nice mix. 


STEP 7 - Pour the batter into the prepared cake tin, tap it once or twice on your kitchen platform. It helps to remove the air bubbles if any.


STEP 8 - Garnish it with sliced banana and some chopped chocolate on the top.


STEP 9 - Bake in pre-heated oven at 180°C for 45-55 minutes.

STEP 10 - Insert a toothpick/knife in the center , if it comes out clean your cake is ready. 


STEP 11 - Remove from oven and cool for 10 minutes and then demold.


STEP 11 - Cut into pieces and ready to serve.


Serve it with a hot cup of tea as sweet breakfast or evening snack and enjoy...😍

NOTES - *Always add the remaining wet ingredients after you mash the bananas.

* Whisk the flour, corn flour, baking soda, baking powder, and then pour into the wet ingredients in batches.

*  I used dairy milk, but any milk fat is OK. Dairy/ nondairy milks work the same.

* The chocolate/ chocho chips are completely optional. Sometimes I add sliced nuts or raisins instead.

* Time may vary depending upon the brand of oven and ingredients. It may take 5-7 minutes less or more. So start checking it after 40 minutes.

* Remove from the oven and allow the bread to cool completely in the pan set on a wire rack before slicing and serving.

* Cover and store banana bread at room temperature for 2 days or in the refrigerator for up to 1 week. Banana bread tastes best on day 2 after the flavors have settled together.