_________________I am Mrs. Kalpana Mhaske, a Home-Maker, from the city of 52-Gates, one of the famous heritage- destination of the world- Ajanta - Ellora Caves, Bibi-Ka- Maqbara (The Taj of Deccan) and Deogiri Fort. i.e. AURANGABAD. I admire cooking - tryout and innovate different cuisines. Basically, both of my gorgeous daughters are foodie, they have always encouraged me in the kitchen and forced to carve a Food Blog, that’s why, I am happy to share the makings with you. I am an artist too. Painting – especially, Canvas-Painting is my one more hobby. In total - Ours is an ART-FAMILY, my husband is an Architect. In the end, I keep the same belief with Louise Fresco - “ Food, in the end, in our own tradition, is something holy. It's not about nutrients and calories. It's about sharing. It’s about honesty. it’s about identity ”

Saturday 18 April 2020

TOMATO CHE SAAR

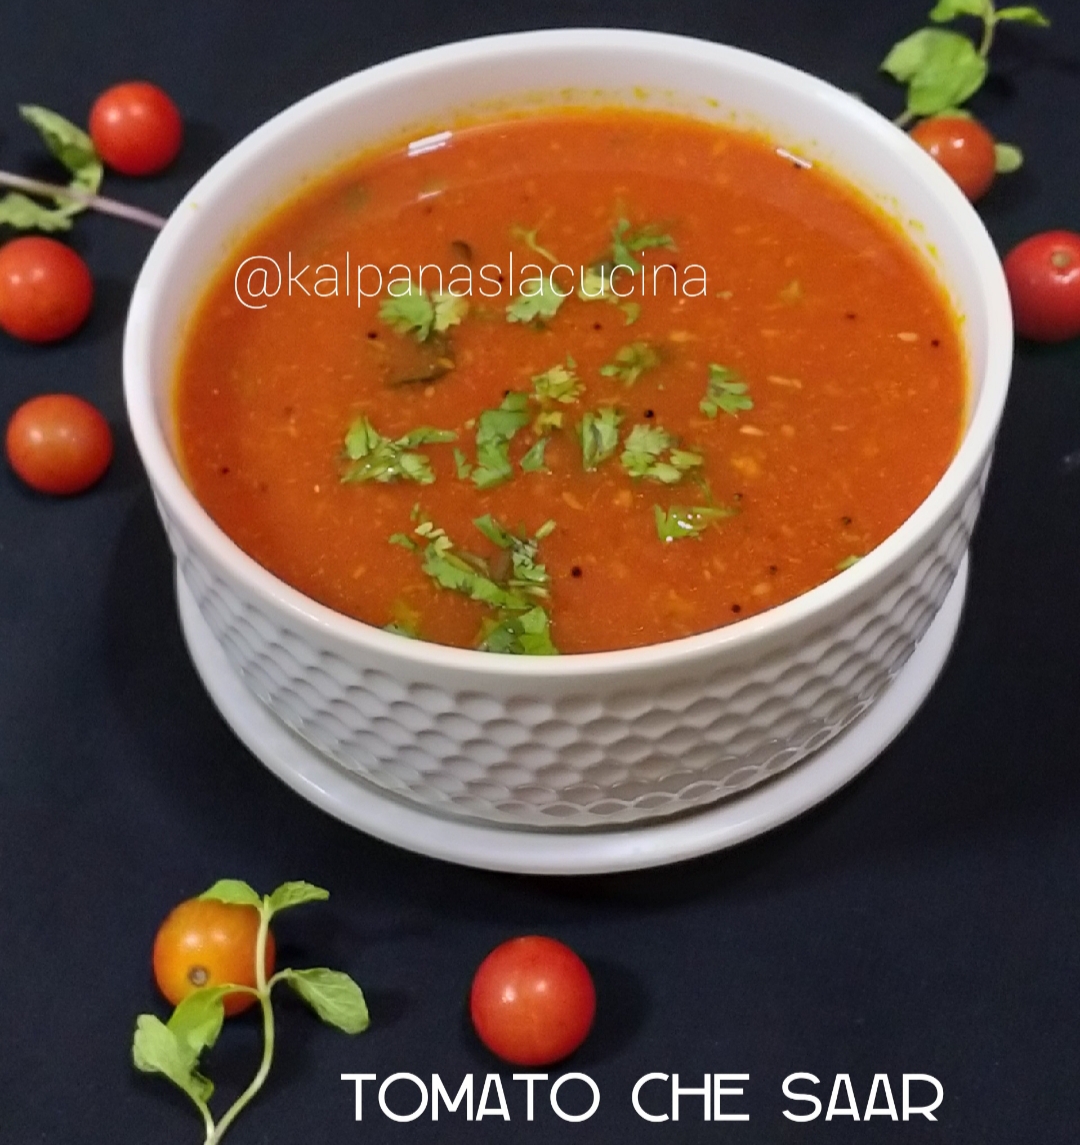
Tomato is amongst one of my favourite veggies. Any Maharashtrian vegetarian thali is incomplete without the Saar. Tomato Saar is one of the basic vegetarian curry prepared in Goan families. The style of preparing may vary from house to house. This is my ultimate favourite winter comfort meal. Tomato saar is basically prepared by blending together blanched tomatoes along with few spices and tempering it with few necessary ingredients. It is sweet, tangy and spiced with green chillies and ginger. The tempering is made by heating ghee and frying cumin seeds, chillies, asafoetida and curry leaves enhances the flavour. You can have it like soup or can be eaten with steamed rice, pulao, etc. So make this quick version of tomato saar and have it plain or with plain steamed rice and do not forget to share your experience. 

INGREDIENTS:
4-5 Big Tomatoes
1 tablespoon Jaggery
1 teaspoon Oil/ Ghee
½ teaspoon Cumin Seeds
½ teaspoon Mustard Seeds
½ teaspoon Sesame Seeds
1 tablespoon Dry Desiccated Coconut
Sprig of Curry Leaves
Pinch Asafoetida
½ teaspoon Red Chilli Powder
¼ teaspoon Turmeric Powder
Salt as needed
Few Garlic Cloves[optional]
METHOD:
STEP 1 – Wash and pressure cook tomatoes for 3 whistles. If you like add garlic cloves in it while cooking.

STEP 2 – Cool it completely, discard the skin and then blend it in mixer pot. Blend it to get a very smooth puree.
Sieve it using a soup strainer.

STEP 3 – Put it in a wok/ sauce pan and put it on the flame. Let it come to complete boil.

STEP 4 – Add jaggery and salt and mix it well.

STEP 4 – When it comes to boil for 2-3 times, switch off the heat.

STEP 5 – Now make a tempering. Add oil/ ghee in a pan, crackle cumin seeds, mustard seeds and then add sesame seeds, asafoetida, curry leaves and desiccated coconut.

STEP 6 - Saute it for few seconds and then add red chilli powder and turmeric powder and mix well.

STEP 7 – Add this tempering to the tomato mixture. Put it on the heat again.

STEP 8 – Boil it for 1-2 minute and saar is ready to serve.
STEP 9 – Garnish it with chopped coriander and serve it.

Serve it hot. It goes well plain like soup or you can relish it with plain steamed rice.

NOTES:  *You can replace green chillies by red chilli powder. I have used red chilli powder for my saar.
                     *I don’t have curry leaves so not added in my recipe.


MATHURA STYLE DUBKI WALE ALOO

Mathura Style Dubki Wale Aloo is a spicy potato dish which is served with either Puri or Khasta Kachori . This particular style of potato curry is very popular in Northern parts of India especially in Mathura/ Agra. Curry is made with the boiled and roughly mashed potatoes with some Indian spices. “Dubki” means “to swim”, so it’s like potato are swimming in the curry. The recipe is quite simple but very flavourful. For the authentic taste, preferably use mustard oil for this curry, it works so well in most north Indian recipes. But if not if not comfortable with mustard oil because of its strong smell, you can go with regular/ vegetable oil. It is a very famous no onion no garlic curry and very different in taste and flavour. Traditionally it is served with Puri or Khasta Kachori but you can serve it with roti/ paratha. The curry is simple in preparation but has a characteristic taste of being spicy. The spiciness comes from the cloves and black peppers. But you can reduce or increase the cloves and black peppercorns on how spicy you prefer. You can use whole spices as it is or if you like can grind them and use. In that case no need of using garam masala powder. Try out this recipe of very delicious UP style Dubki Wale Aloo  at your place and impress your family and friends like I have done. Do not forget to share your feedbacks and suggestions below in the comment box.  

INGREDIENTS:
4-5 medium sized Potato, boiled
½ teaspoon Cumin Seeds
1 teaspoon Grated Ginger
1-2 Green Chillies, chopped finely
1 tablespoon Coriander, chopped finely
2 tablespoon Oil
1 ½ -2 glass Water
Dry Spice Powders Used:
 ½ teaspoon Red Chilli Powder
¼ teaspoon Turmeric Powder
¼ teaspoon Kala Namak [Black Salt]
Salt as needed
1 teaspoon Coriander Powder
¼ teaspoon Garam Masala Powder
½ teaspoon Amchur Powder
½ teaspoon Asafoetida
Whole Spices Used:
1 Bay Leaf
1” Cinnamon stick
2 black Cardamom
2-3 Green Cardamom
3-4 Cloves
5-6 Peppercorns
METHOD:
STEP 1 – Hard boil the potatoes for 2 whistles. After cooling, peel the boiled potatoes and mash it roughly.
STEP 2 – Heat oil in a pan, add cumin seeds and let them crackle.
STEP 3 – Add asafoetida, then add whole spices and roast them for few seconds. [see notes]
STEP 4 – Add chopped green chillies and grated ginger and stir for 30 seconds.
STEP 5 – Add red chilli powder, coriander powder, turmeric powder and mix well. Keep the flame very low.
STEP 6 – Add the potatoes and mix well so that they are coated with the masala mixture.
STEP 7 – Cover it with lid and cook for 5-7 minutes. Stir it once or twice.
STEP 8 - Add a glass of water and increase the heat and let the curry boil once.
STEP 9 – Lower the heat and let the curry simmer till potatoes are cooked.
STEP 10 – Keep adding water as required to get the desired consistency.
STEP 11 – Remove the curry from heat and then add amchur powder and garam masala powder and mix well.
STEP 12 – Dubki Wale Aloo is ready to serve.
Garnish with chopped coriander and serve it hot.
Serve dubki wale aloo with plain poori or bedmi poori or you can enjoy it with roti/ paratha.
NOTES: *If you like you can add the whole spices as it is or make a fine powder with it and then add to your curry.


BEDMI POORI

Bedmi / Bedvi Puri is a very popular breakfast of North India specially in Uttar Pradesh and Delhi. It is the easy and quick version of kachori in which ground dal paste, spices and flour are mixed together to make the dough, but both puri and kachori tastes equally delicious. In some places, dal paste is stuffed inside the flour dough ball and then it is rolled like puri and deep fried. Traditionally Bedmi puris are made with Urad Dal paste but you can use moong dal/ yellow lentil or mixture of both lentils for this recipe. Have seen many recipes with using Urad Dal paste but for my recipe I prefer using moong dal paste. Mathura wale always prefer the crisp Khasta Kachori or Bedmi Puri with Jalebi and Dubki Wale Aloo. So whenever you want to serve your family something different for breakfast or lunch or dinner on weekends, go for it and share your feedbacks.


INGREDIENTS:
2 ½ Cup Whole Wheat Flour
1 Cup Moong Dal/ Yellow Lentil [soaked for an hour]
½ teaspoon Red Chilli Powder [according to your taste]
½ teaspoon Asafoetida
½ teaspoon Fennel Seeds
½ teaspoon Dry Corinader Seeds
2 Green Chillies, finely chopped
Salt as required
2 tablespoon Oil
More Oil for deep frying
METHOD:
STEP 1 – Soak moong dal in enough water for 1 hour. 

STEP 2 – Coarsely ground the fennel seeds and coriander seeds in mortar pestle. Keep aside.
STEP 3 – Now transfer the dal in mixer pot and coarsely ground it.
STEP 4 – Take whole wheat flour in a mixing bowl/ plate, add ground dal, ground fennel seeds and coriander seeds and rest of the ingredients. Mix well.

STEP 5 – Now start adding water as needed and knead a firm dough.
STEP 6 – Cover the dough for 30 minutes and let it rest.
STEP 7 – Divide the dough in equal small lemon size balls.
STEP 8 – Heat oil in a kadai on medium heat.
STEP 10 – Take one dough ball and roll to make medium thick disc/ poori of diameter 3-4".
Likewise roll all the puris with the rest of the dough. Keep them covered.

STEP 11 – Slide the poori in hot oil and deep fry.
Press it gently with the slotted spoon which helps it to puff up.
STEP 12 – Flip it and fry from the other side. Fry till it will turn a nice golden colour.
STEP 13 – Remove and drain excess oil on kitchen towel/ tissue paper and serve hot.
Serve hot bedmi puri with Mathura Style Dubki Wale Aloo or any curry, raita and enjoy the meal.

 NOTES:   *Do not make very fine paste of soaked dal, keep it slightly coarse.
                 *Feel free of using urad dal instaed of moong dal/ yellow lentil or mix dal can be used.


BURGER BUNS [by Japanese Technique – Tangzhong Method]

Bread baking is an art, albeit a very enjoyable and satisfying one. It requires a bit of practice but completely worth the effort because the aroma of freshly baked buns is sure to delight the senses and the scene gets even happier when you watch your loved ones savour the homemade breads.  Nothing can beats the mouthwatering aroma of freshly baked buns that comes right out of the oven. They are so light, fluffy and simply the best. Deliciously soft and fluffy Homemade Burger Buns topped with sesame seeds. Perfect for making burgers. A must try recipe. My daughter love freshly baked breads and buns and also burgers prepared by me. This step by step tutorial helps you hoe to make these best, softest burger buns at home. Just follow the recipe exactly and you will end up with a great product.
                                                                       
                                                                                                              [ 1 Cup = 240 ml ]
INGREDIENTS:

For Roux:
1 tablespoon All Purpose Flour
60 ml/ ¼ Cup Milk
For The Dough:
250 gms / 2 Cups All Purpose Flour
2 tablespoon Sugar
2 tablespoon Milk Powder
½ Cup Water/ Milk [lukewarm]
2 teaspoon Instant Active Yeast
1 teaspoon Salt
2 tablespoon Soft Butter

For Brushing:
1 teaspoon Sesame Seeds
2 tablespoon Milk
Soft Butter
METHOD:
For Making Roux:
STEP 1 – In a pan, add all purpose flour and milk and give a nice mix.
STEP 2 – Heat it and cook with continuous stirring until it becomes thick and pasty.
STEP 3 – Transfer it in a bowl and keep aside to cool.
Yeast Proofing:
STEP 1 – In a bowl, add half of the sugar i.e. 1 tablespoon, yeast and warm milk and give a nice mix.
STEP 2 – Cover it and keep it in a warm place for 5 minutes or till it’s frothy. I kept it in oven with lights on.

STEP 3 – Remove after 5 minutes and you will see the mixture is frothy, foamy and thick.[see notes]
Making Dough:
STEP 1 – In a big mixing bowl, add all dry ingredients- all purpose flour, milk powder, sugar, salt and give it a nice mix.
STEP 2 – Now make a well in the centre. Add cooled roux, proofed yeast and give a mix using a spatula.
STEP 3 – If the mixture looks too dry, add 1 tablespoon milk and mix well.
STEP 4 – Transfer the mixture on the kitchen platform and try to make dough.
STEP 5 – Knead well for 8-10 minutes as shown in the picture below. Dough is sticky and not manageable at start but use a scrapper and try to make a soft and non-sticky dough.
STEP 6 – Now spread the dough and apply 1 tablespoon butter and knead it again till it becomes non-sticky dough. 
Knead it again for 8-10 minutes.
Kneading helps to form a gluten in the dough which helps to make the bread soft and pillowy.
STEP 7 – To check, take a small lemon size ball from the dough.
STEP 8 – Stretch the dough with your fingers and when you see light passing through it, it means your dough is perfectly kneaded.
STEP 9 – Now brush a big bowl with butter, keep the dough in it and apply some butter from the top.
STEP 10 – Now cover it with a cling wrap or a damp cloth and keep it at a warm corner or in the oven for 1 hour or until it double in size. 
Let the dough rise undisturbed.

STEP 11 – Once the dough has risen, punch it for a couple of times to remove the air.
Knead it for 5 minutes. This step is must so don’t skip. It helps to make the pav lighter.

How to Proceed:
STEP 1 – Now divide the dough in equal 6 pieces.
STEP 2 – Make soft and smooth top balls by pinching them downwards to the bottom. Seal the bottom by pinching.
STEP 3 – Place them on the baking tray lined with baking sheet / butter paper.
STEP 4 – Cover the buns with the same damp cloth and keep aside for 1 hour or until it double in size.
STEP 5 – After 1 hour, brush them with milk, and sprinkle some sesame seeds on the top.
STEP 6 – Buns are ready for baking. Bake in a pre-heated oven at 200 degree Celsius or until the top is light brown in colour.
STEP 7 – Remove from oven and brush them with soften butter which gives it a nice shiny top.

STEP 8 – At last, cover them with wet cloth to get a super soft and pillowy texture.


 NOTES:  *Please follow the exact measurements and you can’t go wrong.
                      *When you see the yeast is bubbly and foamy shows that yeast is alive and active.                          *Yeast needs to be froth and bubbly, if it doesn’t then discard and start all over again.
              *Do not proceed if the yeast is not frothy, as the flat yeast will result in dense and sticky pav.
             *Use lukewarm milk/ water. Because hot milk/ water will kill the yeast and it will fail to rise.