_________________I am Mrs. Kalpana Mhaske, a Home-Maker, from the city of 52-Gates, one of the famous heritage- destination of the world- Ajanta - Ellora Caves, Bibi-Ka- Maqbara (The Taj of Deccan) and Deogiri Fort. i.e. AURANGABAD. I admire cooking - tryout and innovate different cuisines. Basically, both of my gorgeous daughters are foodie, they have always encouraged me in the kitchen and forced to carve a Food Blog, that’s why, I am happy to share the makings with you. I am an artist too. Painting – especially, Canvas-Painting is my one more hobby. In total - Ours is an ART-FAMILY, my husband is an Architect. In the end, I keep the same belief with Louise Fresco - “ Food, in the end, in our own tradition, is something holy. It's not about nutrients and calories. It's about sharing. It’s about honesty. it’s about identity ”

Wednesday 22 September 2021

DOMINO'S STYLE ZINGY PARCEL

 Hey everyone, I hope you’re having an incredible day today. Due to the current pandemic situation we are thus bound to live indoors , so many people prefer to order pizzas, burgers, parcels, desserts from Domino's.  Paneer Zingy Parcel is the highlight in Dominos Menu and is my family favourite too. Here is the recipe of most popular and favorite  of all zingy parcel. Paneer Zingy Parcel is one of the most favored of current trending meals on earth. It is one of the sides available in dominos it is a stuffed roll with  paneer, veggies, cheese and seasoned with Italian seasoning. It is crispy, spicy, tangy, and sinful to indulge in. Now you can make your favorite foods to your own home kitchen. You guys are going to love this recipe that can be tried at once. I say ‘must-try’ because it’s unbelievably easy to make and I guarantee that you won’t mess it up. Try it and you won’t regret it. These are impressive, fancy but so simple to make.This bite-sized beauties have easily become favourite at my home. Try these out and you will make your favorite too.


INGREDIENTS :

For Dough -

1-1/2 Cup Maida/ All Purpose Flour

1/2 Cup warm Water

1-1/2 teaspoon Instant Yeast

2 teaspoon Sugar

1 teaspoon Salt

1 teaspoon Garlic Powder / Chopped Garlic

2 teaspoon Olive Oil

Extra Water to knead a dough (if needed)

For Filling - 

100 gm Pander, cut into small cubes

1 Chopped Tomato

1/2 Cup Capsicum, cut into small cubes (see notes)

1/2 Cup boiled Sweetcorn

1 teaspoon finely chopped Garlic

2 tablespoon Butter

1/4 teaspoon Kasoori Methi (optional)

1/4 teaspoon Turmeric Powder

1/2 teaspoon Red Chilli Powder

1/4 teaspoon Garam Masala Powder

1/2 teaspoon Chilli Flakes

1/2 teaspoon Oregano

1/4 teaspoon Black Pepper Powder

Salt  to taste

Other Ingredients - 

2 tablespoon Harrisa Sauce

1/2 Cup Mayonnaise

Corn Meal to roll (makai ka atta)

50 gm Grated Cheese

Butter to apply

1 tablespoon Milk + 1 teaspoon Sugar mixture


METHOD : 

For Making Dough - 

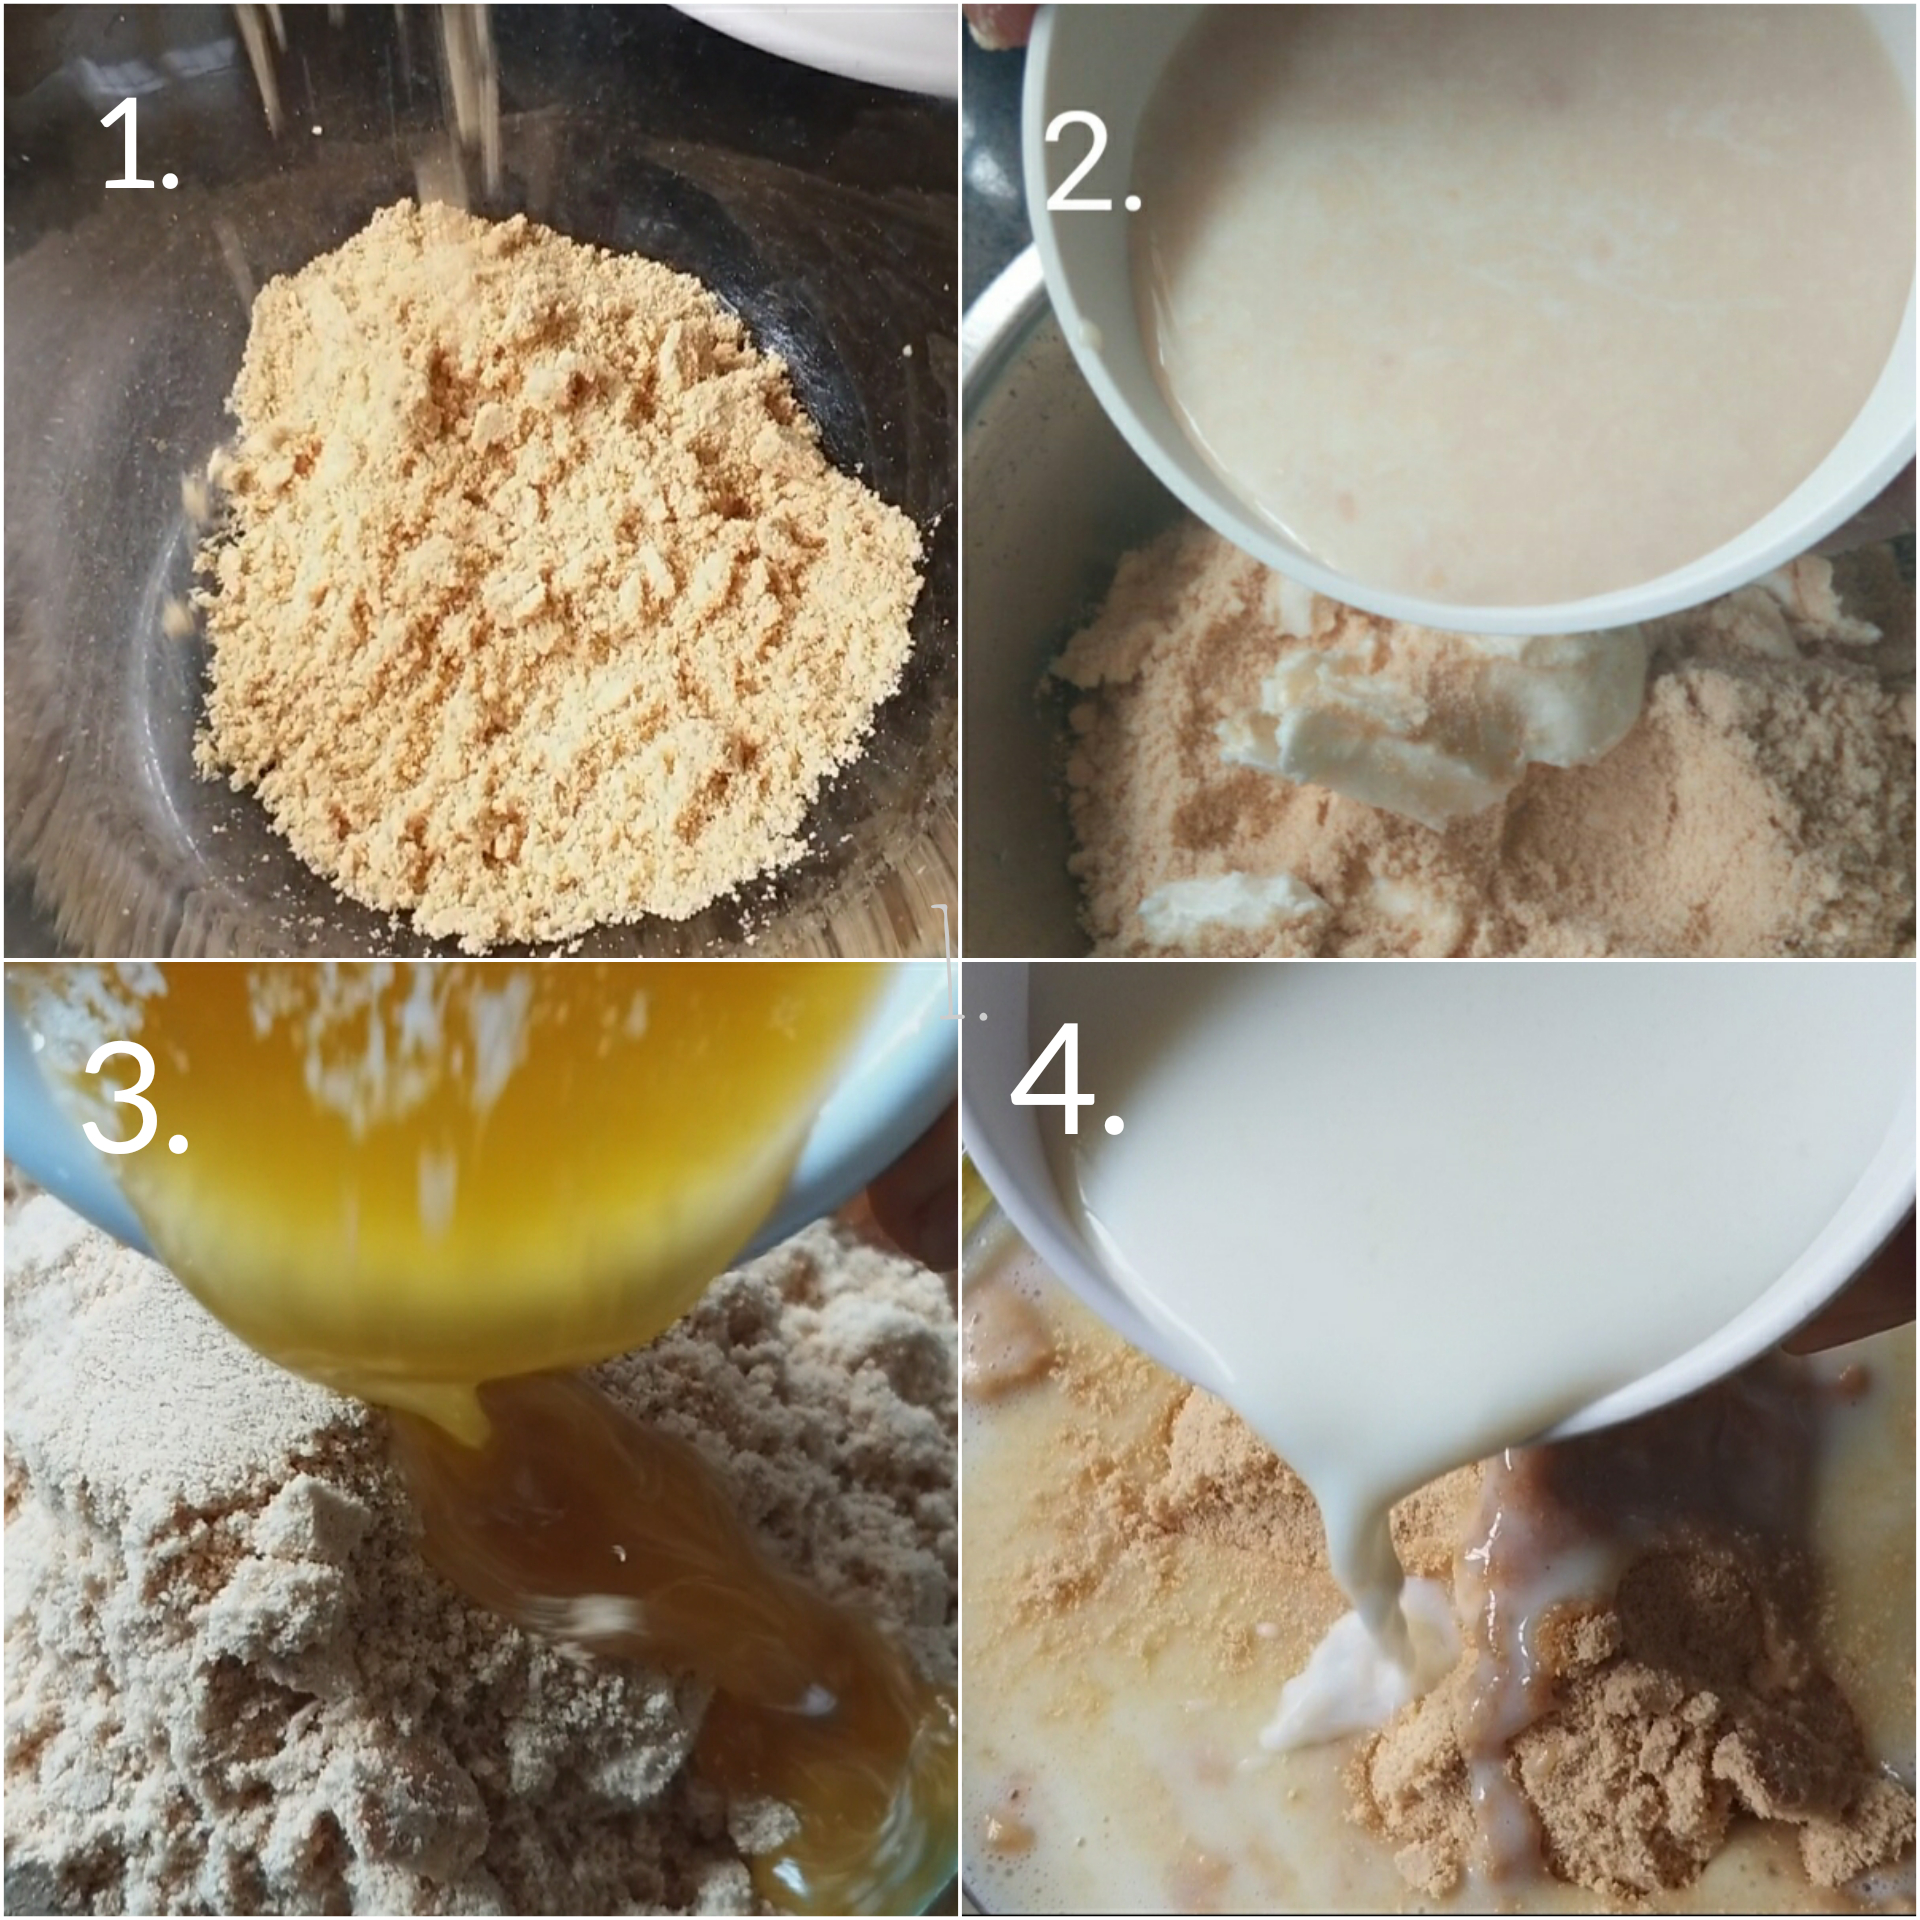
STEP 1 - In a small bowl, add 1/2 cup warm water and sugar and mix it well. Then add instant yeast in it, give it a nice stir, cover it and keep it on a counter to bloom for around 10 minutes.


STEP 2 - Now take another mixing bowl and sift in  1/2 cup Maida/ all purpose flour, garlic powder, salt and mix it well. (see notes)


STEP 3 - Make a well in the centre, add yeast mixture and mix well. 


STEP 4 - Now start making a dough. Add 1-2 spoons warm water if needed while kneading a dough.

STEP 5 - Transfer it on the kitchen counter and knead it for 7-10 minutes. It helps to form the gluten. Make a soft dough.


STEP 6 - Now dough is ready, add 2 tablespoon oil and mix well. You can use butter instead of oil.


STEP 7 - Knead it again for 1-2 minutes and shape it.

STEP 8 -  Now keep it in a greased bowl, cover it with cling wrap/ damp cloth and keep it aside for 1-1/2 hour to proof.


For Making Filling - 

STEP 1 - Heat a pan on low flame, add butter and let it melt.


STEP 2 - Add onion and chopped garlic, roast for 2 minutes. Add salt to fasten the process.


STEP 3 - Add chopped tomato an cook for 4-5 minutes. Cook until they turn soft and mushy.


STEP 4 - Add sweet corn and chopped capsicum and mix well. Cook for 1-2 minutes. We don't needs to cook it for longer time. 

STEP 5 -   Then add spice powders, black pepper powder, chilli flakes and oregano. Add kasoori methi if using. Give it a nice stir.

STEP 6 - Add cubed paneer in it and mix well. Do not cook for longer, just toss and take it out.

STEP 7 - In a small bowl, mix together Harrisa sauce an Mayonnaise and mix it well. This is our Harrisa Mayonnaise ready to use.

STEP 8 - Ad 1 tablespoon of Harrisa Mayonnaise it paneer mixture and give it a nice stir. 


STEP 9 -  Transfer it into a bowl and let it cool down . Our stuffing is ready to use.


How to Make Zingy Parcels - 

STEP 1 - After 1-1/2 hour, you will see the dough is doubled in size.


STEP 2 - Punch the dough using your hands in order to remove the air.

STEP 3 - Knead the dough again for 2-3 minutes with very hands. 

STEP 4 - Dust your counter with some corn meal and keep the dough and divide it into equal 6 pieces.

STEP 5 - Roll them and make smooth balls. Cover them with damp cloth.

STEP 6 - Take one ball, dust your counter with some corn meal and start rolling with a rolling pin into a small disc of 6-7 inch.

STEP 7 - Now fold the edges as shown in the picture and a make triangle shape.


STEP 8 - Put  1 teaspoon Harrisa mayonnaise and spread it evenly.
STEP 10 - Put around 1 tablespoon filling in the centre. 

STEP 11 - Sprinkle some grated cheese on it (see notes) and apply water on the three corners of the rolled disc.


STEP 12 - Now bring all points together to the middle and pinch it properly with very light hands to seal them. 


STEP 13 - Brush them with some milk + sugar mixture.

STEP 14 - Sprinkle some chilli flakes, oregano/ mixed herbs and then place them on the baking tray lined with butter paper / parchment paper.


STEP 15 - Preheat oven for 10 minutes at 250 degree C. 

STEP 16 - Bake for 10 minutes at 250 degrees C and then rotate the tray and bake for another 10 minutes or until light brown colour on the top. It is important to rotate the tray, otherwise they will brown on only one side.


STEP 17 - When done, remove the tray and immediately brush them with some melted butter and cover them with a damp cloth for 5 minutes before serving. 


 Serve them hot with schezwan chutney and mayonnaise and enjoy.

NOTES : 

* You can use coloured bell peppers also.  

* You can use veggies of your choice.

* Mixing of salt is very important, otherwise your yeast will die.  

* If you have left with some stuffings, you can use it in the sandwiches.

* I have used small pieces of cheese slice as I don't have cheese cubes.


Sunday 19 September 2021

CHOCO LAVA MODAK - 2

 Ganesh Chaturthi also known as Vinayaka Chaturthi is one of the important Hindu festivals celebrated throughout India with a great devotion. This day is celebrated as the birthday of Lord Ganesh.The yummiest modak for Ganapati Bappa!  The Choco Lava Modak has chocolate that melts in your mouth. Choco lava modak has become a sensation over the years, and you were surprised to know how easy it is to out together.  Make this your special treat this Ganesh Chaturthi. It has a nice biscuit flavour to it, which helps to balance the sweetness and strong taste of chocolate. Just microwave for few seconds before serving.These tempting modaks oozing out choco lava are ready in no time. Not only your bappa but your family and friends would enjoy them, specially kids would gaga over these. With homemade recipes and feast, you can make the festival special not only for yourself but for your family too. And while you are at it, you can try and be as creative as you want!


INGREDIENTS:

250 gm Digestive Marie Biscuits(or as per your choice)

150 gm Condensed Milk

1/4 Cup Butter

1/4 Cup Milk

1 Cup Fresh Cream

1/2 Cup Sweetened Chocolate

2 tablespoon Cocoa Powder

METHOD:

STEP 1 - Make small pieces of biscuits and pour into a mixer jar. Blend it to make a fine powder.


STEP 2 -  Now pour thepowderedbiscuitsin a mixing bowl and add butter, condensed milk and milk in it.


STEP 3 - Mix well and make a smooth dough.


STEP 4 - Add cocoa powder and mix it well. Keep the dough aside.

STEP 5 - If you are not be able to knead a dough, add milk in it and then knead it.


STEP 6 - Heat cream in a pan and add it to grated chocolate. Mix it and your chocolate ganache is ready. Keep this aside and let it come to room temperature. 

STEP 7 - Fill chocolate ganache in a piping bag .Keep it aside. You can directly pour the ganache with spoon. 

STEP 8 - Grease the modak mould using ghee and close it as shown in the picture below.  Put a small portion of biscuit dough and start filling it from the bottom but keep some space for filling chocolate ganache in it.


STEP 9 - Pipe chocolate ganache in each modak.


STEP 10 - Seal the bottom with some biscuit mixture carefully. Do not press too much.


STEP 11 - Remove the modak gently from the mould.


STEP 12 - Repeat the same and prepare all the modak.

Keep them gently on a plate.


STEP 12 - Modak is ready for naivedya. Serve Choco lava modak to your guests and surprise them.


NOTES: *If you are not serving them immediately, then just before serving microwave the modak for just few seconds, which helps to melt the chocolate inside the modak. And when you open the modak , the lava comes out....serve and enjoy.


MAWA GUJIYA

A traditional sweet, Gujiya is popularly made on the occasion of Holi, Teej and Diwali. This North Indian dessert is truly delicious and can be made with some easily available ingredients in your pantry like - khoya, sugar, almonds, green cardamom, semolina, coconut and flour. Gujiya or mawa gujiya has a flaky crisp outer crust with sweet inner stuffing. This is mawa gujiya with khoya filling, is very rich and delicious. Traditionally, Gujiya is prepared using ghee which makes it rich and aromatic. However, if you want to reduce the calorie content, you can also replace it with some refined oil  There are different types of gujiya recipes. When I googled for gujiya recipes it was almost similar to our samosas. Follow us through some simple steps and nail this easy delight! This quick and easy gujiya recipe will help you make the perfect Gujiya even if you have never made them before. Ready in just one hour, this step-by-step gujiya recipe is great to prepare for guests and relatives.

( 1 cup = 240 ml )

INGREDIENTS : 

For Dough -

2 Cup All Purpose Flour / Maida

1/4 Cup Melted Ghee, at room temperature

1/2 teaspoon Salt

water as needed

 For Stuffing - 

1 Cup Mawa

1/4 Cup Grated Dried Coconut

1 tablespoon Sooji / Semolina (roasted)

1/3 Cup Powdered Sugar, or more as per your taste

1 tablespoon chopped Almonds

1 tablespoon chopped Cashew nuts

2 tablespoon Raisins

1/2 teaspoon Green Cardamom Powder

A pinch of grated Nutmeg

For Sugar Syrup -

1 Cup Sugar

1 Cup Water

Few strands of Saffron (kesar)

1/2 tsp Green Cardamom Powder

Other Ingredients -

Oil / ghee for frying 

Few Rose Petals for garnishing

1 tablespoon Chopped Pista, for garnishing

Silver Warq

METHOD : 

For Making the dough -

STEP 1 - In a mixing bowl, sift flour and salt and add ghee. Using your fingertips, rub the flour and ghee until the mixture resembles like breadcrumbs . Take some mixture in your hand and try to press. If it holds the shape then the moyan is perfect.


STEP 2 - Add water slowly in small batches, mix and then begin to knead. Make a stiff dough. Do not over knead the dough. (See notes)


STEP 3 - Cover the dough with a damp cloth and let it  rest for 1/2 an hour.


For Making Stuffing - 

STEP 1 - In a mixing bowl, add and mix all the stuffing ingredients together with your hand and


keep it aside.

For Making Sugar Syrup -

STEP 1 - In a vok/ vessel,  add water, sugar and and cook on low flame until one string consistency.


STEP 2 - Add saffron strands and cardamom powder. 


STEP 3 - Sugar syrup is ready. Cover and set aside. 


Making the Gujiya -

STEP 1 - Knead the dough for a minute and divide it into equal parts.


 STEP 2 - Take one portion, make a ball and cover the rest with the same damp cloth.


STEP 3 -  Then roll into a round puri like shape, approximately 3 mm thick.  You can cut the round using a round plate or a cookie cutter.


STEP 4 - Take 1- 1/2 tablespoon stuffing mixture and place on one side. 


STEP 5 - Wet the edges with water. 


STEP 6 - Flip the other side over it. Then press to seal the edges. 


STEP 7 - Cut off the extra edges or with a fancy cutter or fork or with your hand make a design all along the sealed edges.


STEP 8 - Once done, cover with the wet cloth and set aside. 


STEP 9 - Likewise, make all the gujiyas and keep under the wet cloth till you fry.

STEP 10 - Heat a pan with enough oil in it.


STEP 11 - When the oil is hot, add 4-5 gujiyas at a time. Make sure fry only a few at a time. Do not overcrowd the pan.


STEP 12 - Fry over low to medium flame for 12-15 minutes.

STEP 13 -  Slowly turn them when done from one side.

STEP 14 -  Fry until they look nice golden brown in colour.


STEP 15 - Now transfer them to an absorbent paper/ kitchen towel to drain  excess oil if any.

STEP 16 - Repeat the same process and fry all the gujiyas.

STEP 17 - Now place the fried gujiyas in the sugar syrup, dipped for a minute. Make sure that the sugar syrup is still warm.


STEP 18 -  Then transfer them to a plate to dry.  


STEP 19 - Mawa gujiyas are ready to serve. 


Garnish with some chopped pista, rose petals and silver warq.


Serve hot or cold and store the rest in an airtight container.


NOTES : *The prepared dough should be stiff and not loose.

               *If your dough is too soft and sticky,  add 1-2 teaspoon flour. If it's too stiff then add few drops of milk/ water and knead it again.

             * Rolling it thin ensures crispy outer layer.

               *While greasing with water make a little broad sealing so that while cutting there is enough space in the sealed area to cut/trim.

                *If you don’t have the cutter spoon, just use a pizza cutter.Else seal it by pressing it with your fingers.You can even fold it but folding gives crisp hard edges after frying so I suggest to just press and seal.Else slightly press it with a fork.

               *Make sure you keep the dough and prepared somas covered before frying.

               *You can use the leftover inner stuffing for making sweet paratha for kids, tastes great.