_________________I am Mrs. Kalpana Mhaske, a Home-Maker, from the city of 52-Gates, one of the famous heritage- destination of the world- Ajanta - Ellora Caves, Bibi-Ka- Maqbara (The Taj of Deccan) and Deogiri Fort. i.e. AURANGABAD. I admire cooking - tryout and innovate different cuisines. Basically, both of my gorgeous daughters are foodie, they have always encouraged me in the kitchen and forced to carve a Food Blog, that’s why, I am happy to share the makings with you. I am an artist too. Painting – especially, Canvas-Painting is my one more hobby. In total - Ours is an ART-FAMILY, my husband is an Architect. In the end, I keep the same belief with Louise Fresco - “ Food, in the end, in our own tradition, is something holy. It's not about nutrients and calories. It's about sharing. It’s about honesty. it’s about identity ”

Thursday, 25 November 2021

SAOJI MASALA

 Saoji Chicken curry is made with a special hot and spicy SAOJI MASALA which has a unique flavour. Total spice lovers delight! Saoji Chicken/ Mutton is a hot and spicy chicken curry, a true delicacy of Nagpur, Maharashtra. Saoji ( Sahukar word comes from this) is basically an Indian community who were from business (like silk and weaving), frequently based in Maharashtra ,Gujarat and South region. Most of them are mainly non-vegetarian and they love their hot-n-spicy curries. This dish is very very popular in Maharashtra (in Nagpur specially). As you all know I am from Vidarbha region of Maharashtra and I love hot and spicy dishes, especially non-veg.  This Saoji Chicken is one of them. I use to make it frequently and use this freshly prepared masala powder for my curry, so thought of sharing the recipe with all of you.  This masala is so flavourful as it is made with many fragrant and warm spices like poppy seeds, dried coconut, black pepper, coriander seeds, bay leaves, green and black cardamom, cinnamon, cloves and many more aromatic spices. 


You can double up the recipe and store, it keeps well for  weeks like KALA / GODA MASALA. But I suggest do not make more as the curry tastes best with freshly roasted  masala. It gives a very distinct flavor which will fill your whole home with aroma of it. So in my opinion,  try to make a small batch which you can finish in a month or two and prepare again. Hop on to the recipe for detailed step by step recipe.

📌📌Watch the full video recipe here 📌📌

INGREDIENTS :

1/2 Cup Dry Desiccated Coconut ( खोबरा खीस)

3 tablespoon Coriander Seeds (धणे)

10-15 Dry Red Chillies (spicy) (तिखट लाल मिरची) (see notes ) (लवंगी/ गुंटूर)

1/2 tablespoon Caraway Seeds (शहाजीरे)

1 tablespoon Poppy Seeds (खसखस)

1 tablespoon Black Peppercorns (काळे मिरे)

5-6 Green Cardamom (विलायची )

 6-8 Cloves (लवंग )

4-5 Black Cardamom (मसाला विलायची)

5-6 Bay Leaf (तेजपत्ता , तमालपत्र)

1-2 Mace ( जवित्री )

2 tablespoon Stone Flower (दगड फूल )

1-1/2 " Cinnamon Stick (दालचिनी )

1/4 Nutmeg (जायफळ )

2 Star Anise (चक्रीफूल )

1 teaspoon Fennel Seeds ( सौफ )

1/2 tablespoon Chana Dal ( चण्याची डाळ )

 1 tablespoon Rice ( तांदुळ ) (see notes )

METHOD : 

STEP 1 - Sundry all the spices for a day or two covered with muslin or a net to get rid of any moisture in the spices. (see notes)

STEP 2 - Heat a pan / kadai on low flame.

STEP 3 -  Add coriander seeds and roast them on low flame for 2-3 minutes or until it gives nice aroma. Transfer to a plate to cool down. 


STEP 4 -  Dry roast the whole spices one by one depending on the size. Transfer it into a plate.


STEP 5 - Next dry roast the dessicated coconut on very low flame until it gives out an aroma and changes colour. Remove and transfer to the plate.


STEP 6 - Dry roast red chillies and bay leaf seperately with 1-2 drops of oil. 


STEP 7 -  Dry roast rice and chana dal for 1-2 minutes.

STEP 8 - Transfer and keep it with the rest of the ingredients. Let them cool completely.


STEP 8 - After cooling completely, take it into a heavy duty blending jar. Do it in small 2-3 batches.


STEP 9 - Grind it properly until a fine powder. 


STEP 10 - Transfer it in a mixing bowl. Mix it well and cool it completely before storing.


STEP 11 - Your authentic SAOJI MASALA is ready to store. 


STEP 12 - Put it in a clean and air tight jar and use whenever you want to use. 


STEP 13 - Your aromatic and flavourful SAOJI MASALA is ready to use. Use as in your veg as well as nonveg curries and make them more delicious. 


NOTES : * Alternatively you can also microwave the spices for 30 seconds.

* You can increase/ decrease the number of red chillies as per your taste.

* You can use this masala for both veg and non veg curries. 

* Instead of chana dal and rice, you can use 1 tablespoon of Sorghum Flour. Dry roast it and mix it with other ingredients while grinding.


Friday, 29 October 2021

SCHEZWAN CHUTNEY

 Schezwan chutney / sauce needs no special introduction. I am always carried away by the vibrant color of this chutney. This is my second attempt of making the chutney and my daughter and my nephew said it is very much close to the store bought one. Homemade Schezwan chutney (Szechuan) is ‘extremely spicy’ but ‘extremely tasty’  that you should be making at home right away. If you like Schezwan noodles or fried rice, then you should make this easy sauce at home. Schezwan Chutney is a popular dip for momos. I also use this Schezwan chutney to prepare many Chinese recipes too. Nothing can beat the taste of noodles cooked in spicy schezwan chutney. It’s a sauce that can be made easily at home. This chili sauce recipe is one of those sauces you should definitely try. Schezwan chutney recipe is nothing but chili garlic sauce. In India we call Schezwan chutney/ sauce and it’s a fusion Indo-Chinese recipe and can be prepared with the ingredients include red peppers (dried red chilies) soaked in water besides loads of garlic and ginger, schezwan peppers, soy sauce, white vinegar, sugar and  tomato ketchup. Schezwan sauce by n ature is spicy, but it doesn’t have to be “mouth on fire” spicy! The authentic flavor of Schezwan chutney comes from Sichuan pepper. Sichuan peppers have unique aroma and flavor, with slightly lemony overtones. Its unique flavor creates a tingly numbness in the mouth, which is similar to hot spices like red chili or black pepper. But is much different from them, and it ignites the taste buds. In my recipe I replaced Sichuan pepper with black pepper as I don't have it. This Schezwan sauce is a perfect balance of taste:  hot, spicy, delicious that does not burn your throat. Even your stomach will feel comfortable after consuming it. It flavors your tongue, but you will never feel it burning in your stomach. 

Serve your homemade Schezwan sauce as a dip for your momos or use it as a spread for your roll recipes. Or refrigerate it in an airtight jar to use later for preparing your Schezwan Fried rice, Schezwan noodles, etc. Once you try this easy homemade schezwan chutney recipe you’ll never be able to go back to the bottled one. Though meant for Chinese cuisine, my daughter love this schezwan chutney as a spread for her toast, dosa, paratha too. After all taste and flavors matter right. Easy to prepare and stores well in the refrigerator for months.

📌📌Watch the full video recipe here📌📌

INGREDIENTS :

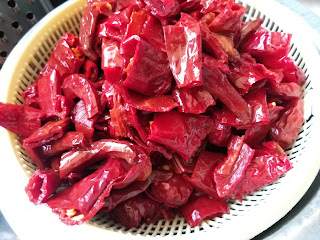
100 gms Kashmiri Red Chillies

1 Cup Oil

1 Cup Garlic, finely chopped

3/4 Cup Ginger, finely chopped

2-3 Green Chillies, finely chopped

3 tablespoon Coriander Stems / Celery Stems, finely chopped

3/4 th Cup Tomato Ketchup

4-5 tablespoon Red Chilli Sauce

1 teaspoon Light Soy Sauce

2 tablespoon Vinegar

2 teaspoon Salt or as per your taste

1 teaspoon White Pepper Powder

1/2 teaspoon Sugar

1/4 teaspoon Black Pepper Powder

2 litre Water

METHOD :

STEP 1 - Remove the stalks from the whole Kashmiri red chilies. It is easy to remove the stalk from dry chilies. So, remove them at this stage. Then break the chilies into half.


STEP 2 -  Cut them and discard the seeds from whole dry red chilies.


STEP 3 - Heat water in a big vessel.


STEP 4 - When it comes to rolling boil, add red chillies and let them boil/ cook for at least 20-25 minutes. (see notes)


STEP 5 -  After the red chilies get soft due to soaking or boiling in water, 

switch off the flame and drain the water from the red chilies.


STEP 6 - Use a strainer and strain them and let them cool down to room temperature.


STEP 7 - Transfer them to a grinder jar and blend to make a coarse paste. Do not add any water while blending.


STEP 8 - Heat oil in a deep kadhai / pan on medium high heat.


STEP 9 - Add chopped garlic and cook on medium high heat until light golden brown in colour.


STEP 10 - Further add chopped ginger, green chillies and coriander/ celery stems. (see notes)


STEP 11 - Cook for 4-5 minutes on medium high heat.


STEP 12 - Now add coarsely grinded red chili paste, mix well and cook for 15 minutes on high flame.


STEP 13 - Keep stirring continuously and cook the chillies until you see oil separated. Time may vary.


STEP 14 - Add tomato ketchup, red chili sauce, soy sauce and vinegar, give it a nice stir and cook further for another 15-20 minutes on medium high flame. 


STEP 15 - Add salt, sugar, white pepper, freshly grounded black pepper powder and mix well.


STEP 16 - On high flame, fry this mixture for 4-5 minutes continuously stirring, until the oil starts leaving the sides of the sauce. Continuous stirring helps to avoid burning to the bottom. At this stage, colour darkens a bit.


STEP 17 - Now you can see oil seperated and floating on the top. Switch off the stove and let your Schezwan chutney cool down.


STEP 18 - Cool down the chutney completely. Then store in a clean, sterilized glass jar.


STEP 19 - Schezwan chutney is ready to use.


Serve your homemade Schezwan chutney as a dip for your momos / nachos or use it as a spread for your roll recipe or refrigerate it in an airtight jar to use later for preparing your Schezwan Fried rice, Schezwan noodles, etc.


NOTES : * You can soak red chillies in water for 8-10 hours /overnight.

* Then boil them in the same water for 6-8 minutes.

* If you want more spicy schezwan chutney then increase green chillies.

* Time may vary according to your gas burner pressure.

* Texture of the chutney should be like jam and the oil has totally seperated from the chutney.

* Colour of the chutney looks more dark as compared to the colour we started.

* Cool down the chutney completely before storing in a jar.

* Refrigerate the chutney for longer shelf life.

* Make sure there is a layer of oil over the chutney which helps to maintain the shelf life of the chutney.

* Always use a clean spoon remove the chutney


Recipe inspired by : Your Food Lab ( Chef Sanjyot  Keer )

Wednesday, 20 October 2021

SPROUTED MOONG APPE

 Appe is a south Indian dish and can be made sweet and spicy both. My family loves appe in any form and when they are made extra healthy then its over in no time! Weekends are special with special breakfast and if you want to make something with ingredients at hand and also quick and healthy then this is perfect recipe. Sprouted Moong Appe is very easy to prepare. The time goes only in soaking and grinding the green gram. It is crisp from outside, rich in protein, perfect for breakfast . The best part of the batter is that , the same batter can be used to make both idli and appe. You can make it with very few ingredients and enjoy as a healthy snack. It is an easy way to make kids enjoy healthy stuff. Can’t express the happiness in words when they demand again and again. This green moong rava appe has a lovely texture. It is crispy from outside while the center is butter soft.  This is an instant version of appe and the time taken to prepare instant appe is very less. You need to have only the soaked green gram/ moong ready before you are ready to make this. The green colour is sure to entice the little guests. One bite of this appe will make them reach out for more. A very healthy, tasty and easy recipe.


INGREDIENTS :

1 Cup Sprouted Moong

1-2 Green Chillies

1/2 inch Ginger

1 teaspoon Fruit Salt / Eno

2 tablespoon chopped Coriander/Dhania leaves

2 tablespoon chopped Onion (optional)

Salt as needed

For Tadka :

1 - 2  teaspoon Oil

1/2 teaspoon Mustard Seeds/Rai

1/2 teaspoon Urad Dal

Few Curry Leaves

METHOD :

STEP 1 - Wash and soak the whole green gram / moong overnight.


STEP 2 - Rinse well and drain all the water from it.

STEP 3 - Add the sprouts in mixer pot with green chillies, chopped coriander, chopped ginger and salt and start blending.

STEP 4 - Add 1-2 tablespoon water while grinding.

STEP 5 - Transfer the batter in the mixing bowl. Adjust the consistency of the batter. 


STEP 6 - Cover and keep the batter aside for 10 minutes. (see notes)

For Vaghar/ Tarka/ Tempering : 

STEP 1 - Heat oil and add mustard seeds and urad dal, cook till urad dal turns golden.


STEP 2 - Then add  curry leaves saute for 1 minute. 

STEP 3 - Add the tempering to the batter and mix well.


STEP 4 - Add some more chopped Green chili (optional ) and chopped curry leaves ( optional ) and give it a nice stir. 

STEP 5 - You can add chopped onion and cilantro/coriander leaves/dhania if you like.

STEP 6 - Check and add salt if needed. Batter is ready to use.


How To Make Appe :

STEP 1 - Heat the appe pan and  grease it with little oil.


STEP 2 - Add Eno to the batter and give it a nice mix. (I missed this picture)

 STEP 3 - Pour a spoonful of batter into each mould / cavity.


 STEP 4 - Cover the pan with lid and cook on low flame for 5-7 minutes or until it becomes golden brown.


STEP 5 - Now turn the appe upside down. Cook uncovered till becomes light brown.


 STEP 6 - It'sready to serve. 


Serve with chutney or tomato ketchup and enjoy.


NOTES : * I have a small Appe pan ,so I like to add 1/2 teaspoon Eno to half the quantity of batter,  when I am ready to put in the second batch, I add Eno again just so they all stay soft and fluffy. 

                * Batter should not be very thick or thin.