_________________I am Mrs. Kalpana Mhaske, a Home-Maker, from the city of 52-Gates, one of the famous heritage- destination of the world- Ajanta - Ellora Caves, Bibi-Ka- Maqbara (The Taj of Deccan) and Deogiri Fort. i.e. AURANGABAD. I admire cooking - tryout and innovate different cuisines. Basically, both of my gorgeous daughters are foodie, they have always encouraged me in the kitchen and forced to carve a Food Blog, that’s why, I am happy to share the makings with you. I am an artist too. Painting – especially, Canvas-Painting is my one more hobby. In total - Ours is an ART-FAMILY, my husband is an Architect. In the end, I keep the same belief with Louise Fresco - “ Food, in the end, in our own tradition, is something holy. It's not about nutrients and calories. It's about sharing. It’s about honesty. it’s about identity ”

Thursday, 13 June 2019

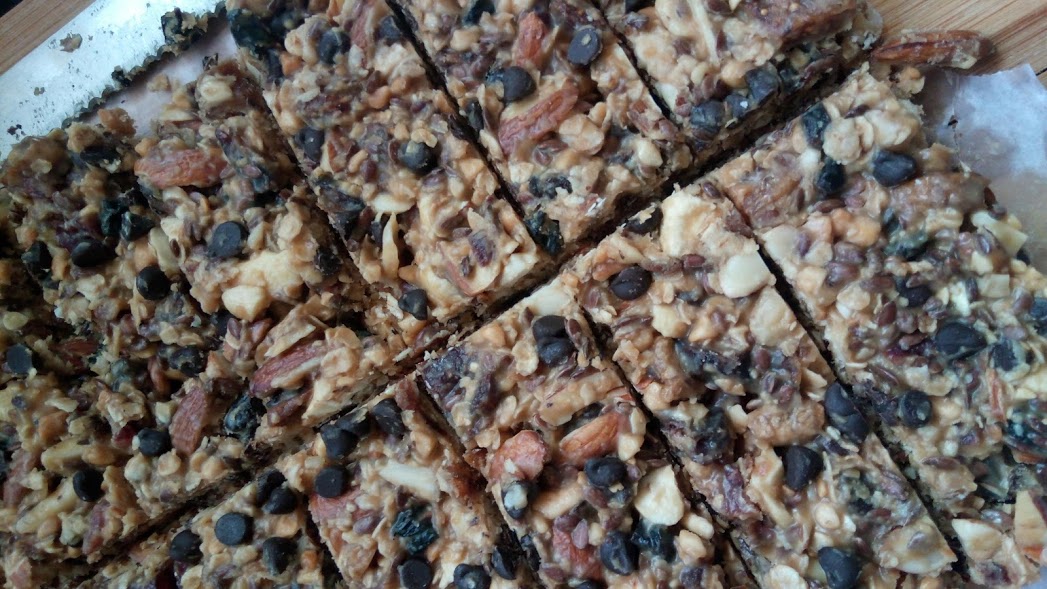
NO BAKE PEANUT BUTTER GRANOLA BARS

Homemade and healthy no bake peanut butter granola bars will be your new favourite snack. These chewy granola bars are packed with wholesome ingredients like peanut butter, flax seeds, almonds and chocolate chips. Easy and no bake granola bars are flavoured with crunchy peanut butter and sweetened with honey...!! Perfect after school snack for the kids or healthy snack for you. I know they are healthy and that's why I am giving them to my daughter as she was not well from last few days and I need some healthy and balanced snack for her. I am always looking for ways to satisfy her sweet tooth with something that actually has some nutritional value. I have all ingredients on hand and I can mix in my favourite extras.I like to store them in the refrigerator, they are of the soft, chewy variety and best kept in fridge. I have added dried cranberries, black raisins and handful of chocolate chips. But you can substitute these with whatever seeds and dried fruits you have. It has been so handy to have these in the fridge to grab for a quick snack when needed.

INGREDIENTS:
½ Cup Oats
½ Cup Dates, pitted
½ Cup Dry Anjeer, chopped finely
¼ Cup Almonds
¼ Cup Cashews
¼ Cup Walnuts
¼ Cup Black Raisins
¼ Cup Dried Cranberries
3 tablespoon Flax Seeds
¼ Cup Choco-chips
½ Cup Peanut Butter
¼ Cup Honey
2 tablespoon Butter

METHOD:
STEP 1 – Dry roast oats, almonds and flax seeds separately and keep aside.
STEP 2 – Chop dates, anjeer, black raisins and dried cranberries finely. Roughly chop dry nuts and keep aisde.

Add oats, dry fruits, flax seeds, chopped nuts, dates and anjeer in a mixing bowl.

STEP 3 – Now heat a pan with butter. When it melts, add peanut butter and honey and mix well.

STEP 4 – Whisk it until smooth. Switch off the flame and let it come to room temperature.
STEP 5 – Line a 8 inch baking tray with a parchment/ butter paper and set aside.

STEP 6 – Add nuts and oats mixture to butter mixture and give a nice stir. Mix everything very well.

STEP 7 – Pour ¾ th of the choco-chips in this mixture and again mix it with a spatula. 

Mix until well combined.
STEP 8 – Pour this mixture into the prepared baking tray. Press firmly with a back of spatula to form an even layer.
STEP 9 – Then sprinkle reserved choco-chips on the top and press them well with a back of spoon.


STEP 10 – Cover it with a plastic wrap and place in the refrigerator to chill for about 1-2 hours.

STEP 11 – Remove the tray from fridge, gently and carefully remove from the pan using the edges of the parchment paper and transfer to a cutting board.

STEP 12 – Using a sharp knife, cut into equal bars.
Wrap each bar separately in to a butter paper and store in an air tight container for further use.

Have it with breakfast or you can pack them in kids lunch box for their short break recess.

NOTES: *Store in an air-tight container or zip-lock bag at room temperature for upto 3 days. In refrigerator it will stay up to 10-12 days.

CHINESE BHEL

Chinese Bhel is a crispy, spicy, flavoursome Indo-Chinese street food. It is a crispy version of bhel and tastes delicious and gives a nice twist to your bhel or chinese food craving. It is a favourite street food merges with oriental culture, in this exciting version of bhel. Rather than being made with puffed rice, this unique chinese bhel is made with fried noodles, tossed with colourful sauted veggies and garnished with crunchy spring onions. Chinese bhel is an Indian fast food originated from Northeast India. Basically a variation of chop suey, and it is widely popular in Mumbai. Chinese bhel is a kind of snack, you would want to munch while watching a favourite movie/ T.V. show and drinking chilled soft drinks and you don’t even talk about calories because this is fried noodle salad is not for those who are on a skinny diet expedition.  The flavors of this bhel are quite balanced and has the right amount of sweetness along with the spiciness. It is always on my list of best Indo-Chinese party with Veg Manchurian recipes. The dish has to be served immediately; otherwise, the crispiness of the noddles would be lost and may turn soggy. All the vegetable measurement mentioned below is chopped ones and can be altered accordingly. So lets get to the making……!!!! 

INGREDIENTS:
2 Pack Hakka Noodles
1 Cup Cabbage, shredded
2 Onions, chopped finely
½ Capsicum, chopped finely
2 Green Chillies [as per your taste]
3 tablespoon Schezwan Sauce/ Chutney
1 tablespoon Tomato Ketchup
½ Lemon Juice
2-3 Sprigs Spring Onions
2 tablespoon CornFlour
Enough Oil to deep fry the Noodles
METHOD:
STEP 1 – Boil sufficient water in a vessel with 1 teaspoon oil and salt.
STEP 2 – Add noodles and boil until half done. Don’t cook hakka noodles completely.
STEP 3 – By the time, cut the veggies thinly/ finely and keep aside.


STEP 4 – Pour the noodles on a colander and let all the water from the noodles drain out.
Once the noodles dried completely, transfer them in to a big plate.

STEP 5 – Sprinkle corn flour on it and coat the noodles with corn flour.

STEP 6 – Heat enough oil in a kadai/ frying pan and deep fry hakka noodles until crispy and light golden in colour.

STEP 7 – Likewise, fry all the noodles in small batches,
transfer them on to a kitchen towel to drain excess oil from it and keep aside.

STEP 8 – Once the noodles comes to room temperature, break them in to small pieces.
STEP 9 – Now transfer the fried noodles in to a big mixing bowl, add thinly cut veggies,
sauces, lemon juice and mix it well.

 If needed season with some salt. Bhel is ready to serve.


MYSORE BONDA [with all-purpose flour]

Mysore Bonda recipe is a simple and tasty evening snack that is loved by everyone in India. This is very famous street side food that has people standing in big queue. Mysore bonda is very popular in south india mostly in Karnataka and can be found in tiffin centers, Udupi Hotels and Restaurants. There are two versions of Mysore Bonda one using urad dal and another is with all-purpose flour/ maida. Today I am sharing the maida version of mysore bonda on my blog. If you are in hurry and have no time for soaking urad dal then you can make this version. Both tastes good and they pair perfectly with coconut chutney. They are crispy outside and fluffy inside and can be a delightful treat for any party or snack for tea time. Here in Maharashtra, we make bonda with the stuffing like potato mixture. But these are plain bondas that are lightly spiced and have a crusty outer skin while inner part is very soft and light since they are made with yogurt and maida i.e. all-purpose flour. Also little rice flour is used to make the outer part crusty. They are easy and quick to make at home. So if you are looking for Mysore Bonda recipe that is served in Karnataka restuarants, you can give a try to this. Share your suggestions below in comment box. 

INGREDIENTS:
1 Cup All Purpose Flour
¼ teaspoon Baking Soda
¼ Cup Rice Flour
¾ - 1 Cup Curd
1 Onion, chopped finely
2-3 Green Chillies, chopped
½ inch Ginger, finely chopped
½ teaspoon Cumin Seeds
1 tablespoon chopped Coriander Leaves
Salt as per needed
Water as needed
Oil for deep frying
METHOD:
STEP 1 – In a mixing bowl, add curd and whisk it to make it plain.

STEP 2 – In another mixing bowl, add both the flours with salt and baking soda. Mix it with a fork.

STEP 3 – Then add chopped onion, ginger, green chillies and coriander leaves in it.
STEP 4 – Now add whisked curd in it and mix well.


 STEP 5 – Add water to make a batter. We need a dropping consistency, so don not make it too thin or too thick. Use your hands to check the consistency.

STEP 6 – Heat oil in a wide kadai.

STEP 7 – Take some batter and drop small portions of batter using your hands in hot oil.

STEP 8 – Regulate the flame to medium and keep stirring to cook evenly.

STEP 9 – These bondas usually take some time to fry well. When they turn crisp and golden, remove them with a slotted spoon and put them on a kitchen towel/ tissue paper to drain excess oil.Serve hot.
It tastes best when served hot with a cup of hot filter coffee as a breakfast or as an  evening snack. Serve it with coconut chutney or sambar.


SUKHA BHEL

Sukha bhel is now a world famous snack, as it is not only tasty but convenient too, for both serving at parties and for carrying along picnic basket.  We all love the street food and bhel is one of the most popular dish from roadside vendors. Even if we are on a diet, we can’t resist the temptation of bhel. It is tasty, appetizing and probably not all that unhealthy. No addition of wet chutneys  keep it more dry and crispy. Because of that it is called as dry bhel or sukha bhel. During summers you can add grated or finely chopped raw mango to this and make it slight sour and tang. If you are not using raw mango then increase lemon juice amount slightly.  Sukha bhel is very easy to make, a simpler version of bhel puri,  healthy as well as we are adding most ingredients raw.   This type  of sukha bhel are usually sold at the railway stations or bus stations or many times you will find the vendors outside the college or commercial office buildings. When you add sweet and tangy tamarind chutney and spicy coriander chutney then it is geela bhel. Because the chutneys are wet meaning geela. Here I have used some papdis for making bhel which you can make at home or can buy them from super market. So make this and satisfy your cravings for a chaat instantly.

INGREDIENTS:
2 Cups Kurmure [spiced murmura]
1 chopped Onions
1 chopped Tomatoes
½ Raw Mango, chopped finely/ grated
½ teaspoon Lemon Juice
2 tablespoon chopped Coriander
1 Green Chilli, finely chopped
2-3 tablespoon roasted Peanuts
2-3 tablespoon roasted, spicy Chana Dal
2-3 tablespoon Fried Coconut
2-3 tablespoon Nylon Sev
2 tablespoon medium thick and spicy Sev
4-5 pieces Papdis [which we use for papdi chaat] [optional]
Regular Salt as needed
¼ teaspoon Black Salt
1 tablespoon Sweet Tamarind Chutney [optional]
1 tablespoon Spicy Green Chutney [optional]
½ teaspoon Chaat Masala Powder [optional]
¼ teaspoon Roasted Cumin Powder [optional]

METHOD:
STEP 1 – Take a big bowl, add murmur and all dry ingredients in it. Break the papdis in small pieces and add.  Roughly mix the mixture.
STEP 2 – Now add roasted spicy peanuts, fried coconut and spicy chana in to it.


STEP 3 – Then add chopped onion, tomato, chopped raw mango, chopped coriander, finely chopped green chillies, salt and mix it well.

STEP 4 – Squeeze the fresh lemon juice and toss everything together till well combined.

STEP 5 – Remove it to a serving plate and enjoy it.

 NOTES: * To keep the bhel dry, I skipped addition of chutneys.

                    * If want to make geela bhel, add 1 tablespoon sweet tamarind chutney and 1 tablespoon spicy green chutney in step no. 2  and give a nice mix. Toss everything together until well combined.

Monday, 3 June 2019

SOLKADHI

 Sol kadhi is a popular drink in the entire Goa- Konkan coastal belt. It can be consumed completely on its own or can be served with the main course. Sol kadhi is an interesting drink that combines the sweetness of coconut milk with sourness of kokum. For added taste and flavour curry leaves, garlic and dry red chillies is added to impart spiciness. This makes sol kadhi a complete meal in itself that fulfils almost every taste that is prescribed by Ayurveda and which must be included in our every meal- sweet, sour, spicy, bitter and salty. It serves as a coolant and aids in digestion and is typically consumed after a spicy fish curry.  It is anti-inflammatory and is a great remedy for acidity. It is most famous digestive drink in Malvani cuisine. I have tasted it first at one of my Goan friend now settled in Mumbai. I loved it and want to make it at home.  After few days my daughter’s friend brought me a pack of kokum from Alibagh. I am so excited to try this kokum kadhi and this is my how I started making sol kadhi at home. It turned out super delicious and my hubby is also very happy after tasting it. Sol kadhi is my favourite drink now and although I can devour it in any season. But it is especially refreshing during these mercury-soaring summer days. Give this sol kadhi recipe a try at home, if you haven’t tasted before. Post your suggestions in the comment box below.  
   
INGREDIENTS:
8-10 Aamsul / Kokum
2 Cups + 1 Cup Water
1 Cup Thick Coconut
Salt as needed
1 tablespoon Sugar
For tempering:
1 tablespoon Oil
Pinch of Asafoetida
1 teaspoon Cumin Seeds
1 teaspoon Mustard Seeds
5-6 Garlic Cloves, roughly crushed
2 Dry Red Chillies
1 sprig Curry Leaves
1 tablespoon Coriander Leaves, chopped
METHOD:
STEP 1 – Rinse kokum / Malabar Tamarind/ Amsul with water. Then soak them in a bowl with 1 cup water for 25-30 minutes.
STEP 2 – After 30 minutes, crush kokum petals with hands and squeeze completely in the water itself.
STEP 3 – Now keep a strainer over a bowl,
pour the kokum mixture and strain it.
STEP 4 – Press it and extract all the flavors from kokum.
STEP 5 – Then add more 2 cups water and 1 cup coconut milk and mix well.
STEP 6 – Add sugar and salt and
  mix until well combined and sugar get dissolved completely.


Add chopped coriander and mix well.


STEP 7 – For tempering, take oil in small tempering pan and heat it.
STEP 8 – After heating oil, crackle cumin and mustard seeds, add a pinch of asafoetida.
STEP 9 – Then add roughly crushed garlic, dry red chillies and curry leaves, mix well and cook for 30 seconds.
STEP 10 – Pour this tempering in the kokum mixture and give a nice mix.
STEP 11 – Mix and sol kadhi/ kokum kadhi is ready to serve.
You can serve sol kadhi straight away or you can refrigerate it for 1-2 hours and then serve chilled.

NOTES: *Here I used readymade coconut milk by Dabur Hommade, but you can extract your own at home. The procedure for this is given in my earlier post of solkadi on my blog.


MANGO LASSI

Mangoes…!!! The King of Fruits has many followers world over. Yeeeeaaahhh, they are delicious and more than half of Indians are passionate with them. Mango lassi are my very favourite drink to order at restaurants and likely one of my favourite beverage of all time. Punjabis and Maharashtrians love mangoes and have mango-based recipes in almost every course of the meal, right from the Aam ka Achaar made with raw mangoes to delicious, cool mango lassi, aam ras, mango shrikhand with juicy ripe ones. With the mango season upon us, now is the perfect time to enjoy mango lassi.  
This refreshing mango lassi recipe uses only few ingredients only. Cardamom gives the lassi a hint of spice and is ready just in 5 minutes. I love the creamy combination of sweet mangoes and tangy yogurt. The mango pulp imparts a rich golden colour as well as an irresistible aroma and flavour to this drink. You can make this drink even if mangoes are bot in season with frozen pulp. Enjoy making Mango Lassi recipe with detailed step-by-step photos and video below.

📌📌Watch the full video recipe here📌📌


INGREDIENTS:
1 Cup Mango Puree
2 Cup Yogurt/ Curd
1 Cup Milk
1/3 Cup Sugar / Honey
¼ teaspoon Cardamom powder
Few Ice Cubes
8-10 Pistachios, finely chopped
8-10 Almonds, finely slivered
2 tablespoon mango pieces [diced into very small pieces], for garnish
Few Mint Leaves, for garnishing [optional]
METHOD:
STEP 1 – In a mixing bowl or a wide mouth pitcher, add yogurt, mango puree, sugar, milk, ice cubes and cardamom powder.
STEP 2 – With a hand blender, mix it well until well combined.
STEP 3 – Taste if the sweetness is less and add more if needed. Adjust according to your taste. Pour in individual serving glasses.
STEP 4 – Garnish with chopped pistachios, slivered almonds and mint leaves. Ready to serve.
Serve cold to enjoy this creamy and healthy mango drink.

NOTES: * If you like strong mango flavour, you can add more mango puree.
              *If you are using canned mango pulp, then adjust the sugar because some canned pulp contains added sugar. So adjust accordingly.
             *If you are using chilled milk, mango pulp and yogurt then skip adding ice cubes. 
             *If do not have ice cubes, you can refrigerate ready lassi in refrigerator until ready to serve.